
Are you looking to add a unique and flavorful touch to your garden or kitchen? The loroco plant (scientifically known as Fernaldia pandurata) is an excellent choice for those who want to cultivate something truly special. Known for its edible flowers, which are a key ingredient in many traditional Central American dishes like pupusas, loroco is a plant that thrives in warm, tropical climates.
Growing and caring for the loroco plant can seem daunting if you’re unfamiliar with its needs, but don’t worry—this guide is here to simplify the process. Whether you’re a seasoned gardener or a complete beginner, we’ll walk you through everything you need to know to cultivate this flavorful delicacy with ease. From planting tips to common mistakes to avoid, we’ll cover all the essentials to help your loroco plant flourish and provide you with beautiful, harvestable flowers in no time.
Ready to bring this unique plant into your garden? Let’s dive into how to grow and care for the loroco plant, ensuring it thrives in your garden year-round. 
1: What is the Loroco Plant?
The loroco plant (Fernaldia pandurata) is a unique and flavorful addition to any garden, especially for those who enjoy growing edible plants. Native to Central America, particularly in countries like El Salvador, Guatemala, and Honduras, this climbing vine is cherished for its aromatic, edible flowers. The flowers of the loroco plant are widely used in traditional dishes, such as pupusas (a type of stuffed tortilla), soups, and sauces.
Loroco’s Distinctive Features 
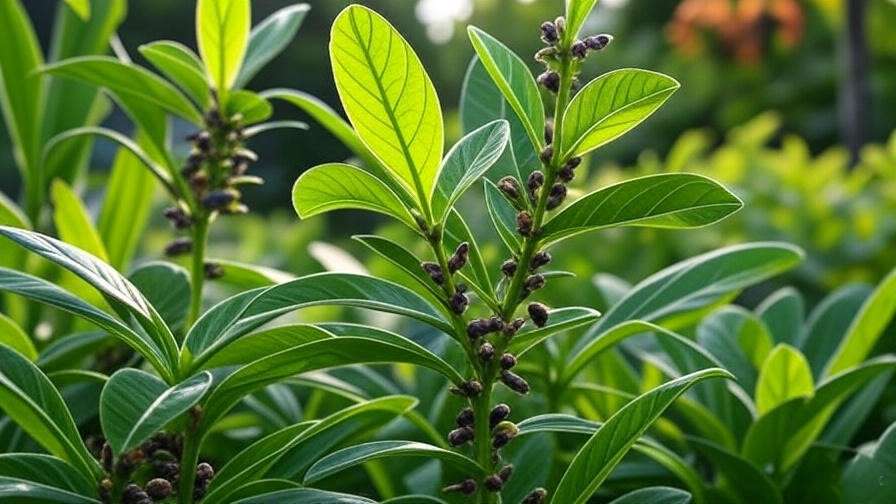
- Appearance: The loroco plant is a climbing vine with long, slender stems and broad, green leaves. Its flowers are small, greenish, and grow in clusters, eventually turning into edible buds that have a unique flavor profile—earthy with a slightly bitter taste, often compared to a cross between squash and asparagus.
- Flavor: The flowers are most commonly harvested before they fully bloom and are enjoyed for their distinct flavor in various Central American cuisines.

Why Grow Loroco at Home? 
- Culinary Delight: The loroco plant adds a special, authentic touch to traditional dishes. Growing it at home means fresh loroco flowers right in your garden, offering a unique flavor that’s hard to find in stores.
- Easy to Grow: Once established, loroco is relatively easy to maintain. It thrives in warm, tropical climates and can be grown in both gardens and containers, making it suitable for a range of environments.
- Low Maintenance: As long as you provide the right conditions—sunlight, warmth, and well-drained soil—the loroco plant will reward you with abundant flowers that can be harvested for use in the kitchen.
In the next sections, we’ll dive deeper into how to grow and care for this flavorful plant, from planting tips to harvesting your loroco flowers for use in delicious dishes.
2: The Best Growing Conditions for the Loroco Plant 
The loroco plant thrives in warm, tropical environments, making it a perfect choice for gardeners in suitable climates. However, to ensure your loroco plant flourishes and produces the flavorful flowers you’re after, it’s important to provide the right growing conditions. Here’s a breakdown of everything you need to know about the ideal environment for your loroco plant to thrive.

1. Sunlight: The Key to Healthy Growth
Loroco plants love the sun, so they should be planted in a location that receives plenty of light throughout the day.
- Full Sun: Aim for at least 6 to 8 hours of direct sunlight daily. The more sun, the better the plant will grow, allowing it to produce healthy vines and flowers.
- Light Shade for Hotter Regions: If you live in a very hot climate, providing some afternoon shade can help protect the plant from scorching heat while still allowing it to thrive.
2. Temperature: Warmth is Essential 
Loroco plants are native to tropical regions, which means they thrive in warm temperatures.
- Ideal Temperature: The plant prefers temperatures between 70°F to 85°F (21°C to 29°C). It’s best to plant it in an area that consistently stays warm.
- Frost Sensitivity: Loroco is sensitive to frost and can be damaged by cold temperatures. If you live in a region with freezing winters, it’s a good idea to grow the plant in containers that can be moved indoors when necessary.
3. Soil: Well-Drained and Fertile
Good soil is essential for the health of your loroco plant. It prefers soil that is rich in organic matter and drains well.
- Soil Type: Use loamy, well-draining soil with a slightly acidic to neutral pH (between 6.0 and 7.0). You can amend heavy, clayey soil with compost to improve drainage.
- Drainage: Poorly-drained soil can lead to root rot, which can severely damage the plant. Ensure the soil allows excess water to flow through easily.
4. Humidity: Keeping It Moist but Not Soggy 
While loroco plants prefer humid environments, it’s important not to let them sit in soggy conditions.
- Humidity Levels: The plant thrives in moderate to high humidity. If you live in a dry climate, you can increase humidity by misting the leaves or using a humidity tray.
- Watering: Water the plant regularly, but allow the soil to dry out slightly between waterings. Overwatering can lead to root rot, so always check the soil moisture before adding more water.
5. Space: Allow Room to Climb 
Loroco is a climbing vine, so it needs vertical space to grow properly.
- Support Structures: Provide a trellis, fence, or other support system to help the plant climb. This will not only encourage healthy growth but also make harvesting easier.
- Spacing: Plant loroco at least 18 inches apart to give it plenty of room to spread out and grow.
Quick Tips for Growing a Thriving Loroco Plant
- Choose a sunny spot: Ensure your plant receives enough sunlight for healthy growth.
- Use well-draining soil: Amend your soil with compost if necessary to improve drainage.
- Water wisely: Keep the soil moist but never waterlogged to prevent root rot.
By providing your loroco plant with the right growing conditions, you’ll be setting it up for success, ensuring healthy growth, and a bountiful harvest of flavorful flowers!
3: How to Plant the Loroco
Planting the loroco plant is a simple and rewarding process, as long as you provide the right conditions and follow a few essential steps. Whether you’re starting from seeds or cuttings, here’s how to successfully plant loroco and set it up for a flourishing future in your garden.
1. Starting from Seeds
While loroco plants are most commonly propagated by cuttings, starting from seeds is also an option if you’re feeling patient.
- Germinating Seeds:
- Soak your loroco seeds for 24 hours before planting to help improve the germination rate.
- Use a seed tray or small pots filled with a light, well-draining seed-starting mix.
- Plant the seeds about 1/4 inch deep and lightly cover with soil.
- Keep the tray in a warm area (around 75-85°F or 24-29°C) and ensure consistent moisture.
- Transplanting:
- Once the seedlings have grown large enough and the roots are well-established, they can be transplanted to their permanent location or into larger pots.

2. Propagating from Cuttings
Starting your loroco plant from cuttings is quicker and more common. Here’s how to do it:
- Taking Cuttings:
- Choose a healthy, mature branch from an existing loroco plant. Use sharp, sterilized pruning shears to take a cutting of about 4-6 inches in length.
- Make sure the cutting has at least two nodes (the spots where leaves emerge) for better rooting.
- Rooting the Cuttings:
- Remove any leaves from the bottom half of the cutting to prevent them from rotting in the soil.
- Dip the cut end in rooting hormone (optional) and plant it in a pot with a well-draining soil mix.
- Water the cutting lightly and place the pot in a warm, bright location but out of direct sunlight.
- Transplanting:
- After 3-4 weeks, once the cutting has developed roots, it’s ready for transplanting to a larger pot or directly into the garden.
3. Preparing the Planting Site
If you’re planting directly in the ground, follow these simple steps to prepare the perfect spot for your loroco plant:
- Soil Preparation:
- Loroco thrives in well-drained, fertile soil. Before planting, amend the soil by adding organic compost or other soil amendments to improve drainage and fertility.
- Ensure the pH level is between 6.0-7.0 (slightly acidic to neutral).
- Planting:
- Dig a hole large enough to accommodate the root system of the plant (about twice the size of the root ball).
- Place the loroco plant in the hole and fill it with soil, ensuring the base of the plant is level with the surrounding soil.
- Gently pat the soil down and water the plant deeply to settle the roots.
4. Container Planting
If you’re growing loroco in containers, use the following tips:
- Choose the Right Pot: Select a pot that’s at least 18 inches wide and deep to give the roots plenty of space to grow.
- Drainage is Key: Ensure your pot has adequate drainage holes to prevent water from accumulating at the bottom, which can lead to root rot.
- Soil Mix: Use a well-draining potting mix, or create your own mix by combining garden soil, perlite, and organic compost.
Quick Tips for Planting Loroco
- Sunlight: Choose a sunny spot with at least 6-8 hours of sunlight per day.
- Spacing: If planting multiple loroco plants, space them about 18 inches apart to allow for growth and airflow.
- Watering: Water thoroughly after planting, but avoid waterlogging the soil. Keep the soil moist until the plant becomes established.
By following these planting steps, you’ll give your loroco plant the best possible start. Whether you’re starting from seed or cutting, with the right care, your loroco will grow into a flourishing, productive plant that rewards you with flavorful flowers!
4: Caring for the Loroco Plant
Once your loroco plant is planted and established, proper care will help it thrive, producing abundant flowers for culinary use. Fortunately, loroco is a relatively low-maintenance plant, but it still needs attention in areas such as watering, fertilizing, and pruning. Here’s how to keep your loroco healthy and thriving.

1. Watering Your Loroco Plant
Watering is one of the most important aspects of care for your loroco plant. While loroco is drought-tolerant, it still needs regular watering, especially during the growing season.
- Water Deeply, Not Frequently: Loroco prefers deep watering over frequent shallow watering. Water the plant thoroughly when the top 2 inches of soil feel dry. This encourages the plant’s roots to grow deep into the soil, which helps it tolerate heat and drought.
- Avoid Waterlogging: Make sure the soil drains well, as stagnant water can lead to root rot. Always check that the container or garden bed has proper drainage.
2. Fertilizing the Loroco
Fertilizing your loroco plant helps it grow strong and healthy, especially during its active growing season.
- Use a Balanced Fertilizer: During the growing season (spring and summer), use a balanced, slow-release fertilizer with equal parts nitrogen, phosphorus, and potassium (e.g., 10-10-10). This will support both leaf growth and flower production.
- Fertilize Sparingly: Over-fertilizing can lead to excessive growth at the expense of flowers. Apply fertilizer every 4-6 weeks, but reduce or stop fertilizing during the dormant winter months when the plant is not actively growing.
3. Pruning for Health and Shape 
Pruning is an essential part of loroco care, helping to promote healthy growth and maintain a tidy appearance.
- Remove Dead or Damaged Growth: Regularly prune away any dead, yellowing, or damaged leaves and branches. This keeps the plant looking neat and encourages fresh growth.
- Encourage Flowering: After the flowering season, deadhead spent flowers to encourage more blooms. If you want to control the size or shape of the plant, prune the stems back slightly in early spring.
- Train the Plant: If you’re growing your loroco as a vine, use supports like trellises to guide its growth and keep the plant upright.
4. Providing Support and Space
As a climbing vine, loroco needs space to spread out and grow, especially as it matures.
- Provide Vertical Support: Use trellises, fences, or other supports to encourage upward growth. Loroco can climb, so providing support helps the plant grow efficiently and keeps it off the ground.
- Allow for Air Circulation: Space your loroco plants about 18 inches apart to ensure proper airflow and reduce the risk of fungal infections.
5. Dealing with Pests and Diseases 
Loroco plants are generally hardy, but they can sometimes attract pests or suffer from diseases if not cared for properly.
- Common Pests: Watch out for aphids, spider mites, and whiteflies. You can treat these pests with insecticidal soap or a gentle spray of water to dislodge them.
- Preventing Diseases: Keep the soil well-drained and avoid overwatering, as these conditions can lead to fungal diseases like root rot. Also, ensure the plant receives enough sunlight to promote healthy growth and reduce the risk of mold or mildew.
Quick Tips for Loroco Care
- Water deeply but less frequently: Let the soil dry slightly between waterings.
- Fertilize during growing season: Use a balanced fertilizer and avoid overfeeding.
- Prune regularly: Remove dead growth and deadhead flowers to encourage more blooms.
- Provide vertical support: Train your loroco to climb and give it space to grow.
By following these simple care guidelines, your loroco plant will remain healthy, productive, and beautiful throughout its growing season, providing you with a delicious, flavorful addition to your meals!
5: Harvesting and Using Loroco
Once your loroco plant has matured and is producing flowers, it’s time to harvest the delicate buds. Harvesting loroco at the right time ensures you get the best flavor and aroma. Let’s go over when and how to harvest, as well as creative ways to use loroco in the kitchen!
1. When to Harvest Loroco Flowers
- Optimal Harvest Time: Loroco flowers should be harvested when the buds are still closed but tender. This is when they have the best flavor—slightly earthy with a mild bitterness that makes them unique.
- Flowering Cycle: Loroco plants bloom repeatedly throughout the growing season, so you can harvest multiple times. Just ensure that you only pick flowers when they are still fresh and not fully opened to maintain their flavor.
- How to Harvest: Use a sharp pair of garden scissors or pruning shears to gently cut the flower clusters from the plant. Be careful not to damage the stems or surrounding leaves.

2. How to Store Loroco
Once harvested, you can store loroco to extend its shelf life.
- Refrigeration: Fresh loroco flowers can be refrigerated for up to a week. Place them in a plastic bag or container lined with a damp paper towel to retain moisture.
- Freezing: For long-term storage, blanch the flowers in boiling water for 1-2 minutes, then quickly cool them in ice water. Afterward, pack the flowers into freezer bags for up to six months.
- Pickling: Loroco can also be pickled in vinegar, garlic, and spices, preserving the unique flavor for future use in various dishes.
3. Culinary Uses for Loroco 
Loroco is incredibly versatile in the kitchen, adding a distinctive flavor to many dishes. Here are some popular ways to use loroco flowers:
- Pupusas: One of the most famous uses for loroco is in pupusas, a traditional Salvadoran dish. Loroco is combined with cheese or beans and stuffed inside a thick tortilla. The result is a delicious, savory treat.
- Soups and Stews: Add fresh or preserved loroco to soups or stews for a burst of flavor. It pairs particularly well with broths or tomato-based dishes.
- Salsas and Sauces: Mix loroco with tomatoes, onions, and peppers to create a fresh salsa. Or, use it to enhance the flavor of sauces for tacos, grilled meats, or pasta.
- Salads and Garnishes: Fresh loroco flowers can be added to salads for a colorful and aromatic touch, or used as a garnish for various dishes.
4. Creative Ideas for Using Loroco
- Loroco Oil: Make a flavorful infused oil by combining loroco with olive oil. This can be drizzled over salads, roasted vegetables, or used for cooking.
- Loroco Pesto: Blend loroco with basil, garlic, and nuts for a unique twist on traditional pesto. Perfect for pasta or as a spread.
Quick Tips for Harvesting and Using Loroco
- Pick early: Harvest loroco buds before they open for the best taste and texture.
- Preserve for later: Store loroco by refrigerating, freezing, or pickling it.
- Add to traditional dishes: Loroco shines in Salvadoran pupusas, but it’s versatile enough for soups, salsas, and more.
By following these harvesting and usage tips, you’ll make the most out of your loroco plant, enjoying its unique flavor year-round. Whether you’re adding it to traditional dishes or experimenting in the kitchen, loroco will bring a delicious, aromatic touch to your cooking. 
6: Troubleshooting Common Problems 
While the loroco plant is relatively easy to grow, like all plants, it can encounter some issues. Understanding and addressing common problems will help keep your loroco thriving. Here are some troubleshooting tips for common challenges you may face when growing loroco.

1. Yellowing Leaves
- Possible Causes: Yellow leaves can indicate several issues, including nutrient deficiencies, overwatering, or poor drainage.
- How to Fix It:
- Nutrient Deficiency: Loroco may need a balanced fertilizer with nitrogen, phosphorus, and potassium. Apply a slow-release fertilizer every 4-6 weeks.
- Overwatering: Ensure the soil drains well and water only when the top 2 inches of soil feel dry. Avoid letting water sit in the pot’s saucer or over the plant’s roots.
- Root Rot: If yellowing leaves are accompanied by a musty smell, root rot might be the issue. Remove the plant from the soil, inspect the roots, and trim away any rotted parts before repotting in fresh, well-drained soil.
2. Stunted Growth
- Possible Causes: Stunted growth could be due to poor soil quality, lack of sunlight, or insufficient watering.
- How to Fix It:
- Soil: Ensure you’re using well-draining, nutrient-rich soil. If necessary, amend heavy or clay-like soil with compost or organic matter.
- Light: Loroco requires full sun for at least 6-8 hours per day. If it’s not getting enough light, move the plant to a sunnier spot.
- Watering: Water deeply but less frequently. Ensure the plant is not sitting in waterlogged soil, as this can stress the roots and stunt growth.
3. Pests
- Possible Pests: Loroco plants can attract pests like aphids, whiteflies, and spider mites.
- How to Fix It:
- Aphids and Whiteflies: Spray the plant with a gentle stream of water to dislodge pests. If the infestation is severe, use insecticidal soap or neem oil.
- Spider Mites: These pests thrive in dry conditions. Increase humidity around the plant by misting it regularly or placing a humidity tray near it.
4. Flowers Not Blooming
- Possible Causes: Loroco plants may fail to bloom due to inadequate sunlight, improper watering, or lack of nutrients.
- How to Fix It:
- Sunlight: Ensure your loroco is getting enough sunlight (at least 6 hours per day). If grown indoors, consider supplementing with grow lights.
- Watering: Water your plant deeply but avoid overwatering. Consistent moisture encourages blooming.
- Fertilizing: If your plant isn’t blooming, it may need more nutrients. Apply a balanced fertilizer, but avoid overfeeding, as too much nitrogen can encourage leafy growth over flowers.
5. Wilting Despite Watering 
- Possible Causes: Wilting despite regular watering is often a sign of root rot or environmental stress.
- How to Fix It:
- Check for Root Rot: If your loroco is wilting and the soil feels soggy, check the roots. Trim away any rotted roots and repot the plant in fresh, well-draining soil.
- Environmental Stress: If the plant is exposed to sudden temperature changes or harsh sunlight, it may show signs of stress. Move the plant to a more stable location with consistent temperatures and moderate sunlight.
Quick Troubleshooting Tips for Loroco
- Yellow leaves: Check for overwatering and consider adding fertilizer.
- Stunted growth: Ensure your plant is getting enough sunlight and water it correctly.
- Pests: Treat with insecticidal soap or a strong water spray to remove pests.
- No flowers: Ensure adequate sunlight, proper watering, and balanced fertilization.
By recognizing these common problems early and addressing them promptly, you’ll ensure your loroco plant stays healthy and productive. With just a little care and attention, your loroco will thrive and provide you with delicious flowers year-round!
Conclusion:
Growing and caring for the loroco plant is a rewarding experience that can bring unique flavors to your kitchen and beauty to your garden. Whether you’re cultivating this tropical vine for its edible flowers or simply to add some greenery to your space, understanding its needs will help you achieve a healthy, thriving plant.
By providing the right growing conditions, following proper planting techniques, and caring for your loroco with regular watering, pruning, and pest control, you can enjoy abundant harvests of these flavorful buds. Plus, with the culinary versatility of loroco, you’ll find endless ways to incorporate its aromatic, slightly earthy flavor into traditional dishes and innovative recipes.
With the tips and techniques outlined in this guide, you now have the knowledge to successfully cultivate and use your loroco plant. Embrace the journey, and soon you’ll be enjoying the vibrant blooms and delicious flowers of this flavorful delicacy year-round.
Happy gardening and cooking! 