Few experiences in poultry keeping are as exciting — or as fragile — as bringing home a box of newly hatched chicks. Within hours, you’ll notice how delicate they are: tiny bodies, fast breathing, constant peeping, and complete dependence on your care. Unfortunately, many beginners lose chicks in the first week due to avoidable mistakes. That’s why mastering a proper Beginner Brooder Setup is the single most important step in raising strong, healthy birds.
A brooder isn’t just a box with a heat lamp — it’s a carefully managed microenvironment that replaces the warmth, protection, and guidance of a mother hen. In my years working with backyard poultry keepers and small-scale farmers, I’ve seen that successful chick rearing comes down to four key factors: correct temperature, clean housing, balanced nutrition, and close observation.
This comprehensive guide walks you through everything you need to know — from equipment selection to troubleshooting health problems — so you can raise vigorous chicks confidently from day one.
What Is a Brooder? (Expert Explanation)
Definition and Purpose
A brooder is a controlled enclosure designed to house newly hatched chicks until they develop enough feathers to regulate their own body temperature.
In natural conditions, a mother hen provides:
-
Warmth
-
Protection
-
Encouragement to eat and drink
-
Behavioral guidance
A properly designed brooder replicates these functions using artificial heat sources, safe housing, and proper nutrition management.
How Long Do Chicks Need a Brooder?
Most chicks require brooder care for 4–6 weeks, depending on:
-
Breed type
-
Climate conditions
-
Feather development
Fully feathered chicks tolerate cooler temperatures and can transition outdoors safely.
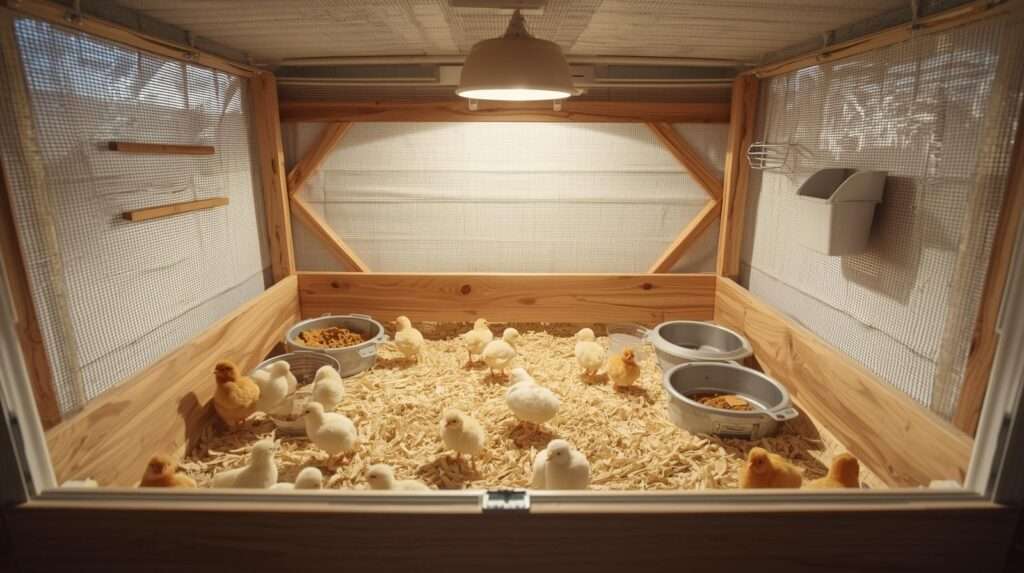
Essential Equipment for a Beginner Brooder Setup
Brooder Container Options
Choosing the right container affects ventilation, safety, and cleaning ease.
Popular options include:
-
Plastic storage bins: Easy to clean and beginner-friendly
-
Stock tanks: Durable and spacious
-
Wooden brooders: Ideal for large batches
-
Cardboard boxes: Temporary and budget-friendly
Key considerations:
-
Smooth walls to prevent escape
-
Adequate airflow
-
Enough floor space
Heat Sources Explained

Heat Lamps
Pros:
-
Affordable
-
Easy setup
Cons:
-
Uneven heat distribution
Heat Plates
Pros:
-
Safer
-
Energy-efficient
-
Mimic natural brooding
Cons:
-
Higher upfront cost
Most experts recommend heat plates for beginners prioritizing safety.
Bedding Materials

Best bedding choices:
-
Pine shavings (primary option)
-
Paper towels (first few days)
Avoid:
-
Cedar shavings (toxic oils)
-
Newspaper (slippery surface causing leg problems)
Feeders and Waterers
Use chick-sized equipment to prevent drowning and contamination.
Tips:
-
Place away from heat source
-
Elevate slightly to reduce bedding contamination
Thermometers and Monitoring Tools
Use digital thermometers for accuracy. Place at chick level, not above.
Step-by-Step Beginner Brooder Setup (Actionable Guide)
Step 1: Choose the Right Location
Ideal brooder locations are:
-
Draft-free
-
Quiet
-
Secure from predators
Indoor spaces such as garages or utility rooms work best.
Step 2: Assemble the Brooder Container
-
Clean and disinfect before use
-
Add bedding layer (2–3 inches)
-
Set feeding and watering areas
Step 3: Install Heat Source and Test Temperature
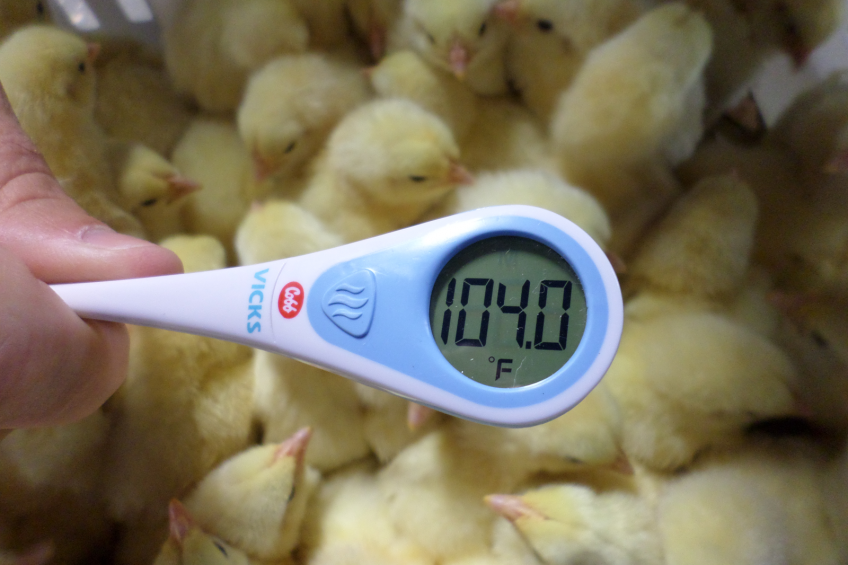
Temperature guidelines:
-
Week 1: 95°F (35°C)
-
Reduce by 5°F weekly
Observe behavior:
-
Huddling = cold
-
Avoiding heat = too hot
Step 4: Add Bedding and Feeding Stations
Arrange zones:
-
Warm zone
-
Feeding area
-
Resting space
Step 5: Introduce Chicks Safely
Upon arrival:
-
Dip beaks gently in water
-
Monitor for first hour
Hydration is critical after transport.
Temperature and Lighting Management (Critical Success Factor)
Weekly Temperature Guide
| Week | Temperature |
|---|---|
| 1 | 95°F |
| 2 | 90°F |
| 3 | 85°F |
| 4 | 80°F |
| 5 | 75°F |
Recognizing Overheating vs Chilling
Overheated chicks:
-
Spread out
-
Panting
Cold chicks:
-
Loud peeping
-
Clustering
Lighting Duration and Growth Impact
Chicks require:
-
16 hours light
-
8 hours rest
Balanced lighting supports growth and stress reduction.
Feeding and Nutrition for Brooder Chicks
Starter Feed Requirements
Provide high-quality chick starter (18–20% protein).
Supplements and Grit Use
-
Electrolytes for stressed chicks
-
Grit only if feeding treats
Preventing Common Feeding Issues
Avoid moldy feed and wet mash buildup.
Hygiene and Biosecurity Best Practices
Cleaning Schedule
-
Daily spot cleaning
-
Weekly full bedding change
Preventing Disease Spread
-
Wash hands before handling
-
Limit visitors
Managing Odor and Moisture
Dry bedding prevents ammonia buildup.
Common Beginner Brooder Setup Mistakes to Avoid
-
Overcrowding
-
Wrong temperature
-
Poor sanitation
Troubleshooting Common Brooder Problems
Pasty Butt
Clean gently with warm water.
Weak or Lethargic Chicks
Check hydration and temperature immediately.
Aggression and Pecking
Provide space and enrichment.
Scaling Your Brooder Setup as Chicks Grow
Space Requirements by Age
Increase floor space weekly.
Transitioning to Grow-Out Pens
Move chicks once fully feathered.
Expert Tips for Raising Strong, Healthy Chicks
-
Observe daily
-
Keep records
-
Reduce stress
Frequently Asked Questions (FAQs)
How many chicks can a brooder hold?
Depends on size and age.
Do chicks need darkness at night?
Yes — rest is essential.
When can chicks go outside?
After full feathering.
Is a heat lamp necessary?
Heat plates are safer alternatives.
Conclusion: Set Up Your Brooder with Confidence
A proper Beginner Brooder Setup ensures chick survival, strong growth, and fewer health issues. With preparation, observation, and consistent care, even first-time keepers can raise thriving flocks.
If you’d like, I can also create a printable brooder checklist or expand specific sections further. 🐥🌱