
Are you tired of spending hours maintaining your lawn, mowing, watering, and battling pesky weeds?  What if there was a way to achieve a beautiful, low-maintenance lawn without all the hassle? The solution is simpler than you might think: learning how to lay artificial turf on grass. Artificial turf offers the perfect blend of beauty and convenience, providing a lush, green lawn all year long without the constant upkeep.
In this step-by-step guide, we’ll walk you through the entire process of laying artificial turf on existing grass. Whether you’re looking to upgrade your yard, save water, or just cut down on maintenance, this guide will give you the practical insights you need to get the job done. From preparing the area to securing the turf in place, we’ve got you covered every step of the way.
Ready to transform your lawn into a low-maintenance, green oasis? Keep reading to discover everything you need to know about laying artificial turf on grass! 

1: Why Choose Artificial Turf Over Real Grass? 
If you’re tired of the constant upkeep and challenges that come with maintaining natural grass, artificial turf might be the perfect solution for you. But why exactly should you choose artificial turf over real grass? Let’s break it down with the key benefits that make it a smart choice for many homeowners.
1. Low Maintenance 
One of the biggest advantages of artificial turf is its low-maintenance nature. Unlike natural grass, which requires regular mowing, watering, and fertilizing, artificial turf stays lush and green without the need for constant attention. Once it’s installed, you can say goodbye to mowing and weeding, saving you both time and energy.
2. Water Conservation 
Artificial turf doesn’t require any water, making it an eco-friendly choice for homeowners who want to conserve water. In regions where water shortages or droughts are a concern, artificial grass helps reduce water usage significantly. This means a beautiful lawn year-round without the need for expensive irrigation systems or frequent water bills.
3. Durability and Longevity 
Artificial turf is designed to withstand wear and tear, making it perfect for high-traffic areas like play areas, patios, or sports fields. It doesn’t fade under the sun, and it’s resistant to pests, diseases, and the harsh effects of weather. With proper care, your artificial turf can last for 15 to 25 years, making it a cost-effective long-term investment.
4. No More Pests or Weeds 
Say goodbye to dealing with pesky weeds and insects that often plague natural grass. Artificial turf eliminates these problems entirely, giving you a cleaner, healthier lawn. You won’t have to worry about harmful chemicals or pesticides either, which are often used to keep weeds and insects at bay in natural lawns.
5. Consistent Aesthetic Appeal
Artificial turf maintains a uniform, lush look all year round, regardless of weather conditions. While natural grass can go brown in the winter or get patchy in the summer, synthetic grass looks perfect 365 days a year. No more worrying about dry spots, brown patches, or areas that just won’t grow.
6. Pet and Kid-Friendly 

Artificial turf is an excellent choice for homes with pets or young children. It’s safe to play on, doesn’t get muddy after rain, and can easily be cleaned. Whether it’s your dog running around or your kids playing soccer, artificial turf provides a soft, durable surface that stands up to the rigors of family life.
7. Environmentally Friendly 
While synthetic turf may seem like an environmentally unfriendly option at first glance, it actually offers some great environmental benefits. By reducing water usage, eliminating the need for harmful chemicals, and decreasing lawn mower emissions, artificial grass helps create a greener planet.
Choosing artificial turf over real grass offers a host of benefits that make it the smart choice for many homeowners. It’s low-maintenance, water-efficient, durable, and provides a clean, consistent look all year long. If you’re looking for a hassle-free, long-lasting lawn solution, artificial turf could be the answer! 
2: Tools and Materials You’ll Need 
Before you begin the process of laying artificial turf on grass, it’s essential to gather all the right tools and materials. Having everything on hand will make the installation smoother and more efficient. Here’s a comprehensive list of what you’ll need to get the job done right!
1. Artificial Turf Rolls
- Why You Need It: The most important material! Choose high-quality turf that matches the color, texture, and durability you want for your lawn.
- Tip: Measure the area you plan to cover before buying to ensure you get the right amount of turf.
2. Base Material (Gravel, Sand, or Crushed Rock)
- Why You Need It: A solid base is crucial for a level, durable surface. Base material provides drainage and support for the turf.
- Tip: Use 2-3 inches of base material to ensure a firm and well-drained foundation.
3. Weed Barrier Fabric
- Why You Need It: This fabric helps prevent weeds from growing through your artificial turf. It’s a simple but essential step in ensuring your lawn stays clean and free of unwanted plants.
- Tip: Make sure the fabric covers the entire area, with a few inches of overlap to avoid gaps.
4. Adhesive and Seam Tape
- Why You Need It: If you’re using multiple turf rolls, you’ll need to join them securely. Adhesive and seam tape make it easy to create smooth, seamless connections between pieces.
- Tip: Make sure the adhesive is compatible with both the turf and the base materials for a strong bond.
5. Landscape Staples or Turf Nails
- Why You Need It: These are used to secure the artificial turf in place, especially along the edges and seams.
- Tip: Space the staples about 6 inches apart for optimal coverage and stability.
6. Shovel and Rake
- Why You Need It: You’ll need a shovel to remove any existing grass or debris, and a rake to level and smooth out the surface before laying the turf.
- Tip: A heavy-duty shovel works best for cutting through thick grass or roots.
7. Lawn Roller or Plate Compactor
- Why You Need It: Once you’ve laid the base material, you’ll need to compact it to ensure it’s firm and stable. A lawn roller or plate compactor helps level and firm up the surface.
- Tip: Rent a plate compactor from a local hardware store if you don’t want to buy one for a one-time project.
8. Utility Knife or Turf Cutter
- Why You Need It: You’ll need a sharp utility knife or turf cutter to cut the artificial turf to fit your area and around obstacles like trees or flower beds.
- Tip: Always measure twice before cutting to ensure a perfect fit.
9. Broom or Power Brush
- Why You Need It: After installing the turf, a broom or power brush will help lift the fibers, making your turf look natural and uniform.
- Tip: Brush the turf against the grain to stand the fibers upright and make the lawn look more realistic.
10. Infill (Silica Sand or Rubber)
- Why You Need It: Infill helps keep the artificial grass in place, provides weight, and supports the blades of grass, giving it a natural feel.
- Tip: Spread the infill evenly across the turf and use a broom to work it into the fibers.
Having the right tools and materials is key to successfully laying artificial turf on grass. By gathering these essentials, you’ll set yourself up for a smooth, hassle-free installation that will leave your lawn looking perfect for years to come!
3: Step-by-Step Guide to Laying Artificial Turf on Grass 
Laying artificial turf on grass might seem like a challenging task, but with the right approach, it’s completely doable—even for beginners! Follow this step-by-step guide to create a perfect, low-maintenance lawn in no time.
Step 1: Prepare the Area
Before you start laying your artificial turf, you need to properly prepare the surface. This ensures a stable and smooth foundation for the turf.
- Remove Existing Grass: Use a shovel or turf cutter to dig up the grass and weeds from your lawn. Make sure to clear the area thoroughly so that no grass or roots are left behind.
- Level the Ground: After removing the grass, rake the area to ensure it’s even and smooth. This step is crucial for preventing bumps and uneven turf.
- Clear Debris: Pick up any rocks, sticks, or roots to avoid them interfering with the base and turf installation.
Step 2: Lay the Base Material
A solid base is essential for drainage and stability. Here’s how to create the perfect foundation for your artificial turf.
- Spread the Base Material: Pour 2-3 inches of base material, such as gravel, sand, or crushed rock, over the area. This helps with water drainage and creates a stable surface for the turf.
- Compact the Base: Use a plate compactor or lawn roller to compact the base material. This step is important to ensure that the surface doesn’t shift or settle over time.
Step 3: Install the Weed Barrier Fabric
Preventing weeds from growing through your artificial turf is a must for a clean and low-maintenance lawn.
- Roll Out the Fabric: Lay the weed barrier fabric over the compacted base. Make sure the fabric covers the entire area with a few inches of overlap along the seams.
- Secure the Fabric: Use staples or pins to secure the fabric in place, ensuring it doesn’t shift while you lay the turf.
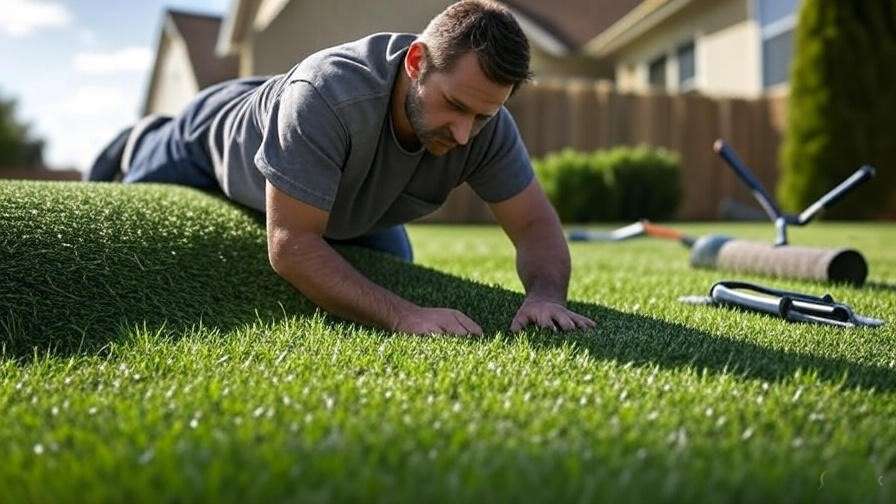
Step 4: Roll Out and Cut the Turf
Now it’s time to lay the artificial turf. Follow these steps to ensure a clean, professional-looking installation.
- Roll Out the Turf: Begin by rolling out the artificial turf across the prepared area. Lay the turf in the direction you want the grass to “flow,” typically with the fibers facing in the same direction.
- Trim the Turf: Use a utility knife to trim the edges and fit the turf around obstacles like trees, flower beds, or pathways. Take your time to ensure a precise fit.

Step 5: Join the Turf Pieces (If Needed)
If you need to join multiple rolls of turf, make sure the seams are seamless for a professional finish.
- Align the Seams: Line up the edges of the turf pieces so they fit snugly together. Avoid overlapping the edges, as this can create uneven seams.
- Use Seam Tape and Adhesive: Apply seam tape along the edge where the two pieces meet, then use adhesive to bond them securely. Press the turf down to ensure a tight connection.
Step 6: Secure the Turf in Place
Now that your turf is laid out and aligned, it’s time to secure it in place.
- Staple the Edges: Use landscape staples or turf nails to fasten the turf along the edges. Space the staples about 6 inches apart for optimal stability.
- Recheck the Alignment: Once secured, double-check the alignment of the turf to ensure it remains straight and snug against the edges.
Step 7: Add Infill and Brush the Turf
Infill helps weigh down the turf and makes it feel more like real grass. Brushing the turf ensures it stands up properly.
- Spread the Infill: Evenly distribute silica sand or rubber infill across the surface of the turf. This step helps the turf blades stand up and provides a soft feel.
- Brush the Turf: Use a stiff broom or power brush to work the infill into the turf fibers. Brush against the grain of the turf to help the fibers stand upright and achieve a natural look.
Step 8: Final Touches
Give your artificial turf a final inspection to ensure everything is secure and looks perfect.
- Check for Gaps or Uneven Spots: Inspect the turf for any gaps or uneven areas. If needed, adjust the turf or add more infill.
- Clean Up: Remove any tools, extra materials, or debris, and give your new lawn a final sweep.
By following these simple steps, you’ll have a beautiful, low-maintenance lawn that looks great all year round! With the right preparation and attention to detail, laying artificial turf on grass will be a rewarding and long-lasting solution for your yard. Ready to enjoy your new lawn? Keep reading for tips on maintaining and caring for your turf! 
4: Maintenance Tips for Artificial Turf 
One of the best things about artificial turf is that it requires far less maintenance than natural grass. However, like any investment, a little care can go a long way in preserving its appearance and functionality. Here are some easy and practical maintenance tips to help keep your artificial turf looking great for years to come!
1. Regular Cleaning 
Even though artificial turf doesn’t require mowing, it still needs regular cleaning to keep it looking fresh.
- Remove Debris: Use a leaf blower or broom to sweep away leaves, twigs, and other debris that can accumulate on the surface. This prevents the turf from becoming clogged and ensures better drainage.
- Rinse with Water: Occasionally rinse your turf with a garden hose to wash away dust, dirt, and grime. This also helps prevent odors and keeps the turf looking vibrant.
2. Brush the Turf
Over time, the fibers of your turf may become flattened from foot traffic or weather conditions. Brushing the turf helps lift the fibers and keeps them upright, giving your lawn a more natural look.
- Use a Stiff Brush: Use a broom or a power brush with stiff bristles to gently brush the turf fibers. Brush against the grain to stand the fibers upright.
- Regular Brushing: Make it a habit to brush the turf every few weeks, especially in high-traffic areas, to maintain that lush, grass-like appearance.
3. Check for Damage 
Although artificial turf is durable, it’s a good idea to inspect it regularly for signs of wear and tear. Catching damage early can help prevent bigger issues down the line.
- Inspect for Tears or Holes: Periodically check for any tears or holes in the turf. If you notice any, use turf adhesive or seam tape to patch them up.
- Secure Loose Edges: If the turf edges start to lift, secure them back down with landscape staples or turf nails.
4. Remove Pet Waste Quickly
If you have pets, you know accidents happen. Fortunately, cleaning up after your furry friends is easy.
- Pick Up Solid Waste: Just like you would on natural grass, pick up solid pet waste promptly.
- Rinse the Area: After removal, rinse the area with water to remove any residual odor. You can also use a mild soap solution to help clean and sanitize the area.

5. Top Up the Infill
Over time, the infill (the sand or rubber particles that weigh down the turf) can settle and compress, especially in high-traffic areas. Adding more infill helps maintain the turf’s stability and softness.
- Evenly Distribute Infill: Use a spreader to evenly distribute new infill over the turf. Then, use a broom to work it into the fibers.
- Replenish as Needed: Depending on the amount of foot traffic and weather conditions, you may need to replenish the infill every year or two.
6. Control Weeds
Though the weed barrier fabric under your turf helps prevent most weed growth, occasional weeds can still pop up.
- Manual Weed Removal: If you notice any weeds, pull them out by hand as soon as possible. Be sure to remove the roots to prevent them from regrowing.
- Spot Treatment: For stubborn weeds, use a mild, non-toxic weed killer that is safe for synthetic grass.
7. Avoid Heavy Equipment 
To keep your artificial turf in top shape, avoid placing heavy equipment or machinery on it, especially if it’s not designed for such weight.
- Limit Foot Traffic: While artificial turf is designed to handle foot traffic, it’s best to avoid excessive weight or pressure in certain areas. Consider using mats or protective covers for heavy furniture or equipment.
By following these simple maintenance tips, your artificial turf will continue to look fresh and vibrant with minimal effort. Regular care helps preserve its longevity, ensuring your lawn remains beautiful and functional for years to come.
Enjoy your low-maintenance, green lawn every day—no mowing, no watering, just a perfect lawn waiting for you! 
5: Common Mistakes to Avoid When Laying Artificial Turf 
Laying artificial turf on grass can be a simple and rewarding project, but it’s important to avoid common mistakes that could affect the quality of your installation. Whether you’re a first-timer or experienced, being aware of these pitfalls will help ensure your turf looks great and lasts for years. Let’s take a look at the most frequent mistakes and how to avoid them.
1. Not Preparing the Ground Properly
One of the biggest mistakes is skipping or rushing the surface preparation. If you don’t properly remove the grass and level the ground, your artificial turf won’t sit properly, which can lead to uneven surfaces or poor drainage.
- How to Avoid It: Take the time to thoroughly remove all existing grass, weeds, and debris. Use a shovel or turf cutter to clear the area, and then rake the ground smooth. A well-prepared surface is key to a successful installation.
2. Using Low-Quality Turf
Not all artificial turf is created equal. Choosing cheap, low-quality turf can result in a lawn that looks unnatural, wears out quickly, and doesn’t stand up to the elements.
- How to Avoid It: Invest in high-quality turf that suits your needs. Look for durable materials that are UV-resistant and designed to last for several years. Higher-quality turf will look more realistic and perform better over time.
3. Skipping the Weed Barrier
A common mistake is neglecting to install a weed barrier. Even though artificial turf is designed to prevent weed growth, without a proper weed barrier, you may see some unwanted plants poking through over time.
- How to Avoid It: Always lay down a weed barrier fabric before installing the turf. This will help ensure that no weeds or grass grow through the turf, keeping your lawn looking neat and tidy.
4. Not Securing the Turf Properly
Many DIY installers underestimate the importance of securing the turf correctly. Without enough staples or nails, the turf can shift, causing seams to separate or edges to lift.
- How to Avoid It: Use landscape staples or turf nails to secure the turf around the edges and seams. Make sure the staples are spaced evenly (about 6 inches apart) to keep the turf firmly in place.
5. Overlapping Turf Seams
While it might seem like a time-saver to overlap seams, this can create uneven areas that are visible and uncomfortable to walk on. It also increases the chance of your turf shifting over time.
- How to Avoid It: Align the edges of the turf precisely, and use seam tape and adhesive to join pieces. A smooth, tight seam will make your lawn look more natural and prevent gaps from forming.
6. Ignoring Proper Drainage
Artificial turf requires proper drainage to avoid water pooling or damage over time. If the base material isn’t installed correctly, or if the turf isn’t level, water can get trapped beneath the surface.
- How to Avoid It: Make sure your base material has a slight slope for proper water flow. Ensure that the drainage holes in the turf are unobstructed and that the surface is level but has a slight incline to direct water away.
7. Using the Wrong Infill
Not all infill materials are suitable for every type of artificial turf. Using the wrong type of infill can lead to poor turf performance, such as a lack of support for the fibers or excessive wear over time.
- How to Avoid It: Choose the right infill for your specific turf and needs. Silica sand and rubber infill are common options, each offering different benefits. Make sure to spread the infill evenly to help the turf fibers stand up properly.
8. Underestimating the Amount of Turf Needed
Underestimating how much turf you need can leave you with gaps or mismatched seams, which can detract from the overall appearance.
- How to Avoid It: Measure your area accurately and add a little extra turf to account for trimming. It’s always better to have too much than too little when it comes to turf installation.
By avoiding these common mistakes, you’ll set yourself up for success and ensure that your artificial turf installation looks professional and lasts for years. Take your time with each step, use the right materials, and don’t skip the important preparation steps—your efforts will pay off with a beautiful, low-maintenance lawn!
Conclusion
Laying artificial turf on grass is a fantastic way to transform your yard into a low-maintenance, lush green space that lasts for years. By following the step-by-step guide and avoiding common mistakes, you can ensure a professional-looking lawn that requires little upkeep and provides year-round beauty.
With the right tools, preparation, and a little effort, your artificial turf will look as good as natural grass without the hassle of constant mowing, watering, or weeding. Plus, you’ll enjoy the benefits of a durable, eco-friendly lawn that stands up to pets, kids, and all types of weather.
Ready to get started? With the knowledge you’ve gained, you can confidently lay artificial turf and create a perfect lawn that will look great and stay functional for years to come. Happy turf-laying!