
Are you looking to add a touch of elegance to your garden without the constant upkeep? Green Velvet Boxwood planting is the perfect solution! This versatile, low-maintenance shrub offers year-round beauty, making it a top choice for hedges, borders, and foundation plantings. But getting it right can be tricky if you’re unsure where to start.
Whether you’re a beginner or an experienced gardener, knowing how to plant and care for Green Velvet Boxwood is crucial to ensure it thrives. In this guide, we’ll walk you through the essential steps, tips, and common mistakes to avoid, helping you achieve a lush, vibrant garden with minimal effort. Ready to create a stunning landscape? Let’s dive in! 🌱
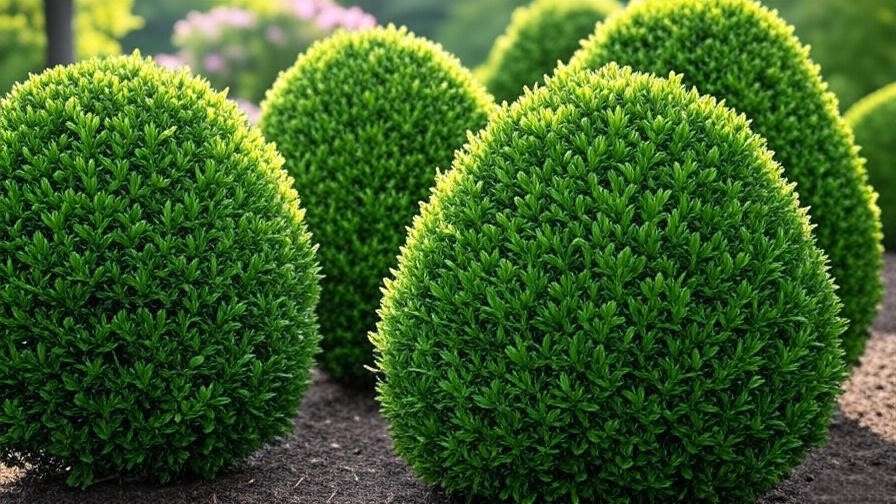
Benefits of Green Velvet Boxwood 🌿
Green Velvet Boxwood isn’t just another shrub—it’s a landscape powerhouse with a range of benefits that make it a must-have for any garden.

Whether you’re new to gardening or an experienced landscaper, here are the top reasons why Green Velvet Boxwood is a standout choice. 🌟
1. Low Maintenance & Easy to Grow
One of the biggest advantages of Green Velvet Boxwood is its low-maintenance nature. Once planted, it requires minimal care compared to other plants. It’s perfect for busy homeowners or those new to gardening who want a beautiful landscape without the stress of constant upkeep. Just a little pruning and occasional watering are all you need to keep it looking pristine.
2. Year-Round Beauty
Unlike many plants that lose their color in the colder months, Green Velvet Boxwood remains lush and green all year long. Its vibrant foliage provides a reliable pop of color through every season, whether it’s winter’s chill or summer’s heat. This makes it an excellent choice for creating structure and beauty in your garden 365 days a year. 🌞❄️
3. Versatile Landscaping Uses
Whether you need a formal hedge, an attractive border, or a specimen plant in your garden, Green Velvet Boxwood fits the bill. Its compact, rounded form allows it to be used in various settings, from small gardens to large estates. Plus, it’s ideal for shaping into topiaries or for privacy screens, giving you endless landscaping possibilities.
4. Resilient and Pest-Resistant
Boxwoods are naturally resistant to many common pests, including deer, which can be a real nuisance in some areas. The Green Velvet variety is also more resistant to common diseases like Boxwood Blight, making it an excellent choice for those looking for a trouble-free plant that won’t succumb easily to pests or environmental stress. 🦌
5. Drought-Tolerant Once Established
After a few years of growth, Green Velvet Boxwood is quite drought-tolerant. It can handle dry spells better than many other shrubs, reducing the need for constant watering. This makes it perfect for areas with water restrictions or for gardeners who don’t have the time to water frequently.
6. Adaptable to Various Soil Types
Whether your soil is sandy, clay-heavy, or loamy, Green Velvet Boxwood can thrive in a variety of conditions as long as it has good drainage. This adaptability makes it a safe bet for almost any garden—whether you’re planting in challenging soil or in a more ideal setup.
7. Compact Growth Habit
If you’re tight on space, Green Velvet Boxwood is your friend! It has a compact growth habit, typically growing between 3 to 4 feet tall and wide, which means it won’t overwhelm smaller gardens or take up too much room. It’s perfect for tight spaces like along walkways or near the edges of garden beds.
Green Velvet Boxwood offers all the benefits of a hardy, beautiful shrub with none of the hassle. Whether you’re designing a sleek hedge or just want a plant that can handle the elements with ease, this shrub delivers—and it does so beautifully. 🌿💚
Planning Your Green Velvet Boxwood Planting 🌱
Proper planning is key to ensuring your Green Velvet Boxwood thrives and becomes the stunning feature you’re hoping for.

From choosing the right planting location to understanding the best time to plant, here’s everything you need to consider before you dig into the soil.
1. When to Plant Green Velvet Boxwood 🌿
Timing your planting is essential to give your Green Velvet Boxwood the best start. The ideal planting seasons are early spring or fall. These cooler months allow the shrub’s roots to establish themselves before the heat of summer or the chill of winter sets in.
- Spring: Plant after the last frost, giving your boxwood a long growing season.
- Fall: Planting in early fall gives your plant enough time to establish roots before the cold weather arrives.
Avoid planting in the heat of summer or during extremely cold winter months, as this can stress the plant and hinder its growth.
2. Choosing the Right Location 🌞
Green Velvet Boxwood thrives in a variety of locations, but you need to ensure that the spot you choose provides the ideal growing conditions.
- Sunlight: This boxwood variety grows best in full sun to partial shade. Aim for at least 4 hours of direct sunlight per day for optimal growth. Too much shade may lead to leggy growth, while too much sun in hot climates can stress the plant.
- Soil Type: Boxwoods prefer well-draining soil. While they can tolerate slightly acidic to neutral soil (pH 6.5–7.0), it’s crucial that the soil doesn’t hold too much moisture, as this can lead to root rot.
- Space Requirements: Although Green Velvet Boxwood is compact, it still needs room to grow. Space your plants about 2 to 3 feet apart if you’re planting a hedge. For individual plants, give them enough room to spread their foliage without crowding other plants.
3. Avoiding Problem Areas ❌
While Green Velvet Boxwood is adaptable, there are a few conditions that can hinder its growth:
- Poor Drainage: Avoid planting in areas where water collects. Standing water can lead to root rot, so make sure the soil drains well.
- Wind Exposure: Strong winds can damage the delicate leaves of boxwoods, especially in winter. Consider planting them in a sheltered area to protect them from windburn.
- Heavy Shade: Too much shade can stunt growth. If your garden doesn’t get enough sunlight, try supplementing with other sun-loving plants or consider relocating your boxwood to a sunnier spot.
4. Testing the Soil 🔬
Before planting, it’s a good idea to test your soil. Ensure that your soil is not too alkaline or acidic for Green Velvet Boxwood. If your soil has drainage issues, amend it by adding organic matter like compost or sand. This will not only improve drainage but also provide essential nutrients to the plant.
AEO Answer: For best growth, plant Green Velvet Boxwood in full sun to partial shade, with well-draining, slightly acidic to neutral soil.
5. Planning for Growth 📏
Green Velvet Boxwood is a slow-grower, but it will eventually fill out and mature to about 3 to 4 feet tall and wide. Be mindful of its mature size when planting near walkways, patios, or other plants. Allow room for it to grow naturally, ensuring it has adequate air circulation and isn’t overcrowded by neighboring plants.
By thoughtfully selecting the right location, planting at the right time, and preparing your soil properly, you’ll set your Green Velvet Boxwood up for success. These simple steps ensure your plant will not only survive but thrive for years to come. 🌿
Step-by-Step Guide to Planting Green Velvet Boxwood 🌱
Planting your Green Velvet Boxwood the right way ensures it will thrive for years to come.

Follow this simple, step-by-step guide to set your boxwood up for success from the start.
1. Prepare the Planting Area 🧑🌾
Before you begin planting, it’s crucial to prepare the area properly. Here’s how:
- Clear the Area: Remove any weeds, rocks, or debris from the planting site. These can compete with your boxwood for water and nutrients.
- Loosen the Soil: Use a shovel or garden fork to break up the soil in the area where you’ll plant. This helps the roots spread easily and get the oxygen they need.
- Check Soil Drainage: Ensure the soil drains well. If it’s heavy clay, amend it with compost or sand to improve drainage.
2. Dig the Right-Sized Hole 🕳️
Now, it’s time to dig the hole for your boxwood:
- Hole Size: Dig a hole that is twice as wide as the root ball and the same depth. This gives the roots plenty of space to spread out and establish themselves.
- Depth Check: Ensure the top of the root ball is level with the ground or slightly above it. Planting too deep can suffocate the roots, while planting too shallow can expose them.
3. Remove the Boxwood from Its Container 🌿
Carefully take your Green Velvet Boxwood out of its container:
- Gently Tip the Plant: Turn the pot on its side and gently tap the sides to loosen the plant. Slide it out, being cautious not to damage the roots.
- Examine the Roots: If the roots appear to be circling the root ball, gently loosen them with your fingers. This helps encourage them to grow outward into the surrounding soil.
4. Place the Boxwood in the Hole 🌳
Now that the hole is ready, place your boxwood in:
- Position the Plant: Place the root ball into the hole and make sure it’s standing upright. The top of the root ball should sit even with or slightly above the soil level.
- Check for Straightness: Step back and make sure the plant is straight. This will give it a balanced, natural look once it’s fully grown.
5. Backfill with Soil 🧤
Next, you’ll fill in around the root ball with soil:
- Use the Existing Soil: Fill the hole with the soil you dug up earlier. As you add the soil, press down gently to remove any air pockets, but avoid compacting it too much.
- Avoid Adding Fertilizer: While it’s tempting to add fertilizer to the planting hole, it’s best to wait until after the plant has settled in. Adding fertilizer at this stage can burn the roots.
6. Water Thoroughly 💧
Watering is a crucial step right after planting:
- Deep Watering: Water the plant thoroughly to help settle the soil around the roots. This also reduces the chances of air pockets, which can dry out the roots.
- Soak the Soil: Ensure that the water penetrates deep into the soil. Aim to water until the ground is moist to a depth of about 6 inches.
7. Mulch Around the Base 🌾
Mulching helps retain moisture, regulate soil temperature, and prevent weeds:
- Apply Mulch: Spread a 2-3 inch layer of mulch around the base of the plant, but make sure the mulch isn’t piled directly against the stem. This helps prevent rot and allows air to flow freely around the base.
- Types of Mulch: You can use organic mulch like wood chips, bark, or pine straw. Just make sure it’s not too thick, as this can impede water flow.
By following these simple steps, you’ll set your Green Velvet Boxwood on the path to success. Proper planting ensures strong root development, healthy growth, and a vibrant shrub that will enhance your landscape for years to come. 🌿
Caring for Your Green Velvet Boxwood 🌿
Taking care of your Green Velvet Boxwood is simple, but it’s essential to provide the right amount of attention to keep it healthy and vibrant.

Here’s everything you need to know about watering, fertilizing, pruning, and more!
1. Watering Your Boxwood 💧
Proper watering is key to a thriving Green Velvet Boxwood. While these plants are relatively drought-tolerant once established, they still need regular watering, especially in the first year.
- Newly Planted Boxwood: Water deeply after planting, then keep the soil consistently moist (but not soggy) for the first few weeks. Aim to water at least once a week if there’s no rainfall.
- Established Boxwood: Once established, water once a week during dry spells. Make sure the soil is moist about 6 inches down, especially during hot summer months.
- Signs of Overwatering or Underwatering: Yellowing leaves or wilting can be signs of stress. Adjust watering accordingly to avoid root rot (from overwatering) or dehydration (from underwatering).
2. Fertilizing Your Boxwood 🌱
Boxwoods don’t require heavy feeding, but they do benefit from occasional fertilizing.
- When to Fertilize: Early spring is the best time to fertilize, just before new growth begins. This gives your plant a nutrient boost as it enters the growing season.
- Type of Fertilizer: Use a slow-release, balanced fertilizer (e.g., 10-10-10). Avoid high-nitrogen fertilizers, which can promote too much leafy growth at the expense of the plant’s overall structure.
- How to Apply: Follow the manufacturer’s instructions. Generally, you’ll sprinkle the fertilizer around the base of the plant, then water it in well.
3. Pruning and Shaping Your Boxwood ✂️
Green Velvet Boxwood has a naturally compact, rounded shape, but it may need some light pruning to maintain its neat look and encourage healthy growth.
- Best Time to Prune: Late winter to early spring, before new growth appears, is the ideal time to trim. This ensures you’re not cutting away potential new growth.
- What to Prune: Remove dead or damaged branches, and trim back any overgrown areas to maintain the shape. You can also trim the tips to encourage a fuller, denser appearance.
- How Much to Prune: Avoid cutting back too much at once. Remove no more than 1/3 of the plant’s size in one pruning session to prevent stressing the plant.
4. Mulching Around the Base 🌾
Mulch is an excellent way to keep your Green Velvet Boxwood healthy by conserving moisture and controlling weeds.
- How Much Mulch to Apply: Spread a 2-3 inch layer of mulch around the base, but don’t pile it directly against the stem. This helps prevent rot and encourages healthy root development.
- Benefits of Mulching: Mulch helps keep the soil cool in summer and insulates the roots in winter. It also retains moisture, reducing the need for frequent watering.
5. Winter Care for Green Velvet Boxwood ❄️
Green Velvet Boxwood is hardy, but it still requires a little extra care in winter, especially in areas with harsh cold or wind.
- Protect from Winter Burn: To prevent winter burn (when the leaves dry out due to wind and sun), wrap the plant in burlap or erect a windbreak.
- Water During Winter: Watering isn’t as frequent during winter, but it’s important to give your boxwood a drink during dry spells if temperatures are above freezing.
By following these simple care tips, your Green Velvet Boxwood will stay healthy and vibrant throughout the year. With the right watering, fertilizing, and occasional pruning, you’ll enjoy this evergreen beauty for many seasons to come! 🌿
Common Issues and Troubleshooting 🛠️
Even though Green Velvet Boxwood is a hardy, low-maintenance shrub, it can face a few common issues.

Identifying these problems early and knowing how to fix them can keep your plant healthy and thriving. Here’s a guide to help you troubleshoot some of the most frequent concerns.
1. Yellowing or Browning Leaves 🍂
If you notice the leaves of your Green Velvet Boxwood turning yellow or brown, it could be due to a few common causes:
- Overwatering or Poor Drainage: Boxwoods do not like to sit in waterlogged soil. If the soil is too wet, it can lead to root rot, causing yellowing or browning leaves.
- Solution: Ensure the soil is well-draining, and avoid watering too frequently. Let the soil dry out between waterings.
- Nutrient Deficiency: A lack of essential nutrients, especially nitrogen, can cause yellowing leaves.
- Solution: Apply a balanced, slow-release fertilizer in early spring to provide the nutrients your plant needs.
- Environmental Stress: Boxwoods can also suffer from stress due to temperature fluctuations or drought, leading to brown edges.
- Solution: Water consistently during dry spells, and provide extra protection in winter by wrapping the plant in burlap to reduce cold wind damage.
2. Pests and Diseases 🦠
While Green Velvet Boxwood is relatively pest-resistant, it can still attract certain pests or be susceptible to diseases, especially if the plant is stressed.
- Boxwood Mites: These tiny pests can cause the leaves to become speckled or discolored. Infestations are often more noticeable in hot, dry weather.
- Solution: Spray the plant with insecticidal soap or neem oil. Make sure to cover all parts of the plant, including the undersides of leaves.
- Aphids: These small insects suck sap from the plant, which can weaken it and lead to distorted leaves.
- Solution: You can remove aphids by spraying your plant with a strong stream of water or using insecticidal soap.
- Boxwood Blight: This fungal disease causes dark spots on the leaves and can lead to defoliation.
- Solution: Remove any affected parts of the plant, and consider using a fungicide if the problem persists. Ensure good air circulation by spacing plants appropriately.
3. Leggy Growth 🌿
If your Green Velvet Boxwood becomes leggy—meaning it grows tall and spindly with fewer leaves—it could be due to too little sunlight or improper pruning.
- Insufficient Light: Green Velvet Boxwood thrives in full sun to partial shade. If it’s not getting enough light, it may become leggy as it stretches toward the sun.
- Solution: Move the plant to a sunnier location or trim back surrounding plants that may be shading it too much.
- Improper Pruning: If the plant has not been pruned regularly, it can also become leggy.
- Solution: Prune in late winter or early spring to maintain a compact shape and encourage healthy, dense growth.
4. Root Rot 🌱
Root rot is a serious issue that can arise when Boxwood is planted in poorly draining soil or is overwatered.
- Symptoms: Yellowing leaves, wilting, and a general decline in plant health are signs of root rot.
- Solution: Ensure that the plant is in well-draining soil and reduce watering. If the plant is severely affected, it may be necessary to dig it up, inspect the roots, and replace it with fresh soil.
5. Winter Burn ❄️
Even though Green Velvet Boxwood is cold-hardy, it can suffer from winter burn. This occurs when cold winds and intense sun dry out the plant’s leaves, leading to browning or damage.
- Symptoms: Brown or crispy leaf edges, especially on the side exposed to wind or sun.
- Solution: Protect your boxwood by wrapping it with burlap or using a windbreak. Mulching around the base also helps insulate the roots during cold months.
By understanding and addressing these common issues, you can keep your Green Velvet Boxwood healthy, vibrant, and looking great throughout the year. If problems arise, act quickly to ensure your plant recovers and continues to thrive! 🌿😊
Advanced Tips for Thriving Green Velvet Boxwoods 🌿
Once your Green Velvet Boxwood is established, it’s time to take your care routine to the next level!

With a few advanced tips, you can maximize its health, beauty, and longevity. These strategies will help your boxwood not only survive but truly thrive, whether you’re aiming for a formal hedge or a feature plant in your garden.
1. Creating a Formal Hedge 🌳
Green Velvet Boxwood is a perfect choice for creating a neat, well-defined hedge. Here’s how to achieve that picture-perfect look:
- Spacing: For a tight, dense hedge, space plants about 2 feet apart. This ensures they’ll fill in quickly and provide solid coverage.
- Regular Pruning: To maintain a tidy, uniform shape, prune your boxwood at least once or twice a year. Trim in early spring before new growth starts and again in late summer, after the plant’s peak growth period. This helps control size and encourages more side branching.
- Shaping: Use shears to shape the hedge to your desired look, whether you prefer a straight, formal line or a more rounded, natural shape. For a sharper edge, use a hedge trimmer for clean lines.
2. Using Green Velvet Boxwood in Landscape Design 🏡
Boxwoods are versatile and can be incorporated into a variety of garden styles. Here are some creative ways to use them in your landscape:
- Accent Plantings: Green Velvet Boxwood works beautifully as an accent plant in mixed borders. Pair it with colorful perennials or flowering shrubs to create a striking contrast.
- Containers and Planters: If you’re short on garden space, consider planting Green Velvet Boxwood in large containers. It’s an excellent choice for entryways, patios, or balconies, as it provides year-round greenery.
- Layering: Use Green Velvet Boxwood as a low-maintenance foundation plant in front of taller shrubs or trees. This layering creates depth and visual interest in your landscape.
3. Companion Planting with Boxwoods 🌼
Green Velvet Boxwood pairs well with many other plants, adding variety and texture to your garden. Here are some great companion plants:
- Hostas: The lush foliage of hostas contrasts nicely with the compact, evergreen boxwood. They thrive in partial to full shade, making them a perfect addition to shaded garden beds.
- Ornamental Grasses: Plants like Blue Fescue or Feather Reed Grass provide a soft, airy texture that complements the dense, structured look of boxwoods.
- Flowering Shrubs: Pair your boxwood with flowering shrubs like Hydrangeas or Roses for a pop of color in the spring and summer months.
4. Promoting Healthy Growth with Organic Fertilizers 🌱
While synthetic fertilizers work, using organic options can improve the long-term health of your Green Velvet Boxwood. Organic fertilizers enrich the soil, promote beneficial microbial activity, and enhance the natural nutrient cycles.
- Compost: Adding a layer of compost in early spring around the base of your boxwood provides a slow-release source of nutrients. It also improves soil structure and moisture retention.
- Organic Fertilizer Blends: Use a well-balanced organic fertilizer that is rich in micronutrients, such as kelp meal or fish emulsion, for an extra boost.
5. Enhancing Winter Hardiness ❄️
Though Green Velvet Boxwood is hardy, a little extra care during the colder months can help protect it from winter stress, especially in regions with harsh winters.
- Winter Protection: For extra protection from winter burn, especially if your boxwood is planted in a sunny, windy location, wrap it with burlap. This creates a shield against cold winds and harsh sunlight.
- Snow and Ice Management: Gently brush off snow or ice from the branches, as heavy accumulation can break the stems. Avoid using salt near boxwoods, as it can harm the plant and the soil around it.
6. Controlling Size and Shape with Boxwood Topiaries 🎨
If you’re feeling creative, shaping your Green Velvet Boxwood into topiaries can add a unique, artistic touch to your garden or home. The compact nature of this variety makes it an excellent candidate for topiary training.
- Training: Start by pruning your boxwood into the desired shape, and use wire frames if necessary to guide the growth. Regular trimming will help keep the topiary shape intact.
- Indoor Topiaries: Smaller, well-pruned boxwoods can make excellent indoor topiaries. Place them in decorative pots for a sophisticated look in your home.
By implementing these advanced tips, your Green Velvet Boxwood will not only thrive but become a standout feature in your landscape. From creating a formal hedge to using organic fertilizers and shaping topiaries, these strategies will elevate your garden’s beauty and health, ensuring your boxwood flourishes for years to come! 🌿✨
Conclusion 🌿
Green Velvet Boxwood is a fantastic choice for any garden, offering year-round beauty, low maintenance, and versatility. Whether you’re looking to create a formal hedge, add structure to your landscape, or simply enjoy its evergreen charm, this shrub is a reliable and stylish option. By following the tips in this guide—starting with proper planting, maintaining regular care, and troubleshooting common issues—you can ensure that your Green Velvet Boxwood thrives.
Remember, a little effort goes a long way in keeping your boxwood healthy and vibrant. From selecting the perfect spot and watering correctly to pruning and protecting it in winter, these simple steps will reward you with a beautiful, hassle-free plant for years to come. 🌱
Start your Green Velvet Boxwood planting journey today, and watch your garden flourish with this timeless, low-maintenance beauty! 🌿
