
Imagine stepping into your garden and picking fresh, home-grown pumpkins that you grew yourself—from a pumpkin you harvested the previous season. Sounds exciting, right?  But did you know that growing pumpkins from a pumpkin is one of the simplest and most sustainable ways to enjoy a bountiful harvest year after year?
In this step-by-step guide, we’ll walk you through everything you need to know about growing pumpkins from a pumpkin. Whether you’re a beginner or an experienced gardener, you’ll learn how to save money, reduce waste, and grow pumpkins in the most organic and eco-friendly way possible. 
1. Why Growing Pumpkins from a Pumpkin is a Smart Choice
Growing pumpkins from a pumpkin you’ve already harvested is not just a fun project; it’s also a smart, sustainable choice for anyone looking to make their gardening or farming efforts more eco-friendly and cost-effective. Here’s why:
Save Money on Seeds 
Instead of buying seeds every year, you can save your pumpkin seeds and replant them for the next season. This means no more spending money on commercial seeds and the added benefit of growing pumpkins with traits you know and love. Plus, it’s a perfect way to ensure that your crop thrives season after season without relying on outside suppliers.
Sustainable Farming Practices 
By growing pumpkins from your own harvest, you’re embracing sustainable farming methods. You avoid the need for store-bought seeds, which can sometimes come with a carbon footprint from production and shipping. This small step towards self-sufficiency is a win for the environment, as it helps reduce waste and encourages natural, eco-friendly farming techniques.

Grow More of What You Love 
One of the best parts about growing pumpkins from a pumpkin is the control you have over your harvest. If you found a variety you loved, saving seeds ensures you can grow more of the same type next year. Whether it’s a particular color, size, or flavor, growing pumpkins from your own harvest gives you the opportunity to fine-tune your crop to suit your preferences.
Maintain Genetic Diversity
Growing your pumpkins from seeds saved from previous harvests can help maintain genetic diversity. Each new generation of plants may be slightly different, but they will have adapted to your local growing conditions. This increases the resilience of your pumpkins, making them more suited to the unique challenges of your climate or garden.
2. Preparing for Pumpkin Growth
Preparing for pumpkin growth is a crucial first step to ensure your pumpkin patch flourishes. With the right preparation, you can create an ideal environment for your pumpkins to thrive. Here’s how to set yourself up for success:
1. Choose the Right Pumpkin for Seed Saving
Not all pumpkins are created equal. To get the best results, choose a healthy, mature pumpkin for seed saving. Look for:
- Heirloom varieties: These pumpkins have a history of being reliable and well-suited for growing.
- Non-GMO pumpkins: If you’re aiming for organic farming, make sure you’re working with a non-GMO variety that hasn’t been treated with chemicals.
2. Prepare Your Soil for Planting
Pumpkins love rich, well-draining soil. Here’s how to get your soil ready:
- Work in organic matter: Add compost, aged manure, or organic fertilizers to improve soil texture and fertility. Pumpkins need nutrient-rich soil to grow big and healthy.
- Check the pH: Pumpkins grow best in soil with a pH between 6.0 and 6.8. You can use a simple pH test kit to check your soil’s acidity level and make adjustments if needed.

3. Find the Perfect Spot for Pumpkins 
Pumpkins need plenty of sunlight and space to grow. Follow these tips to pick the right location:
- Full sun exposure: Pumpkins need at least 6-8 hours of sunlight a day to thrive. Choose a sunny spot in your garden.
- Adequate space: Pumpkins are spreaders, meaning their vines grow long. Make sure the area provides enough space (about 6-10 feet between plants) for them to grow without crowding.
4. Understand Your Climate and Planting Time 
Timing is key when it comes to growing pumpkins. Pumpkins are heat-loving plants, and they won’t thrive in cold soil. To get it right:
- Wait for the last frost: Plant your pumpkins after the last frost date to ensure the soil is warm enough for seed germination. In most areas, this is around late spring or early summer.
- Ideal temperature: Aim for temperatures between 70°F to 90°F (21°C to 32°C) for the best pumpkin growth.
5. Prepare the Soil Beds or Mounds 
Pumpkins grow best in mounds or hills. This helps with drainage and allows the vines to spread out. Here’s how to prepare your beds:
- Create mounds: For better drainage and air circulation, form raised mounds or hills about 6 inches tall. Space them 6-10 feet apart.
- Planting holes: Once your mounds are ready, dig small holes 1-2 inches deep to plant your seeds.
With these preparations, your pumpkins will have the best possible start for a healthy, abundant harvest. Now that your garden is prepped, it’s time to move on to the next step—planting your seeds! 

3. Step-by-Step Guide to Growing Pumpkins from a Pumpkin
Growing pumpkins from a pumpkin is a simple, rewarding process that anyone can do. Follow this step-by-step guide to transform your pumpkin into a thriving crop:

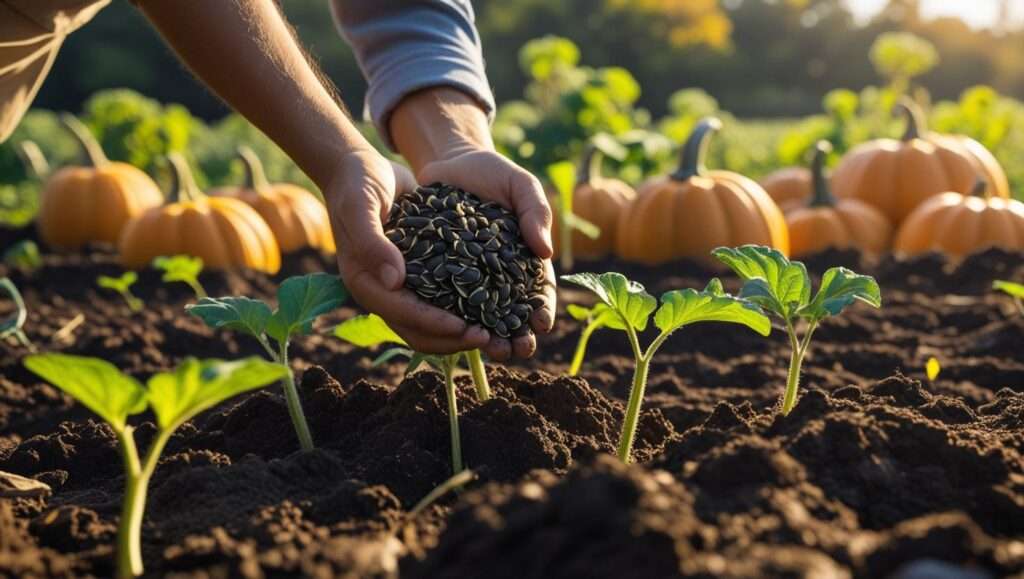
Step 1: Extracting the Seeds
The first step in growing pumpkins from a pumpkin is saving the seeds. Here’s how to do it:
- Cut open the pumpkin: Use a sharp knife to cut the pumpkin open. Scoop out the seeds along with the pulp.
- Clean the seeds: Place the seeds in a colander and rinse them under cool water to remove any leftover pulp. You can also use your hands to gently rub the seeds.
- Dry the seeds: Lay the seeds flat on a paper towel or a clean surface to dry. Let them air dry for 2-3 days to prevent mold from developing.
Step 2: Planting the Seeds
Now that your seeds are clean and dry, it’s time to plant them.
- When to plant: Wait until the danger of frost has passed and the soil temperature is at least 60°F (15°C). This usually happens in late spring or early summer.
- How to plant: Plant the seeds 1-2 inches deep into prepared mounds or hills, ensuring there’s enough space for each plant (6-10 feet apart).
- Water immediately: After planting, water the area gently to help settle the soil around the seeds.
Step 3: Caring for Your Pumpkin Plants
Pumpkins need the right care to grow big and healthy. Here’s how to care for them:
- Water regularly: Keep the soil moist, but avoid overwatering. Pumpkins require about 1 inch of water per week, especially during dry periods.
- Mulch around the plants: Use organic mulch (straw, leaves, or grass clippings) to help retain moisture, prevent weeds, and protect the soil.
- Fertilize naturally: Use organic fertilizers like compost or liquid seaweed to feed your pumpkins. Apply once the plants start to flower to encourage strong fruit development.

Step 4: Pruning and Managing Vines 
As your pumpkins grow, you’ll notice the vines start to spread out. Pruning helps manage growth and focus energy on producing larger pumpkins.
- Pinch off excess vines: Trim back extra vines to ensure the plant doesn’t get too overcrowded. This encourages the plant to focus on the main pumpkin-producing vines.
- Remove unhealthy leaves: Check for dead or diseased leaves and remove them to prevent the spread of pests or mold.
Step 5: Managing Pests and Diseases 
Pumpkins are prone to a few pests and diseases. Here’s how to handle them:
- Aphids and squash bugs: Use organic insecticidal soap or neem oil to control pests.
- Powdery mildew: Avoid overhead watering and ensure proper spacing for airflow to prevent fungal growth. If necessary, apply an organic fungicide.
- Vine borers: Look for wilting vines and remove any affected areas promptly to prevent the spread.
4. Managing Common Issues and Pests
Growing pumpkins is rewarding, but like all plants, pumpkins can face a few challenges. From pests to diseases, here’s how to manage common issues and keep your pumpkin patch healthy and thriving:
1. Dealing with Common Pests
Pumpkins attract a variety of pests, but don’t worry! There are natural ways to control them without using harsh chemicals.
- Aphids: These tiny insects suck the sap from your pumpkin plants, causing yellowing leaves. To manage aphids:
- Spray your plants with a mix of water and dish soap, or use neem oil, a natural insect repellent.
- Encourage natural predators like ladybugs, which feed on aphids.
- Squash Bugs: Squash bugs can damage your pumpkin vines, leading to wilting and yellowing. Here’s how to fight them:
- Hand-pick the bugs and their eggs from the undersides of leaves.
- Apply organic insecticidal soap if the infestation is severe.
- Vine Borers: These pests can be tricky as they burrow into the pumpkin stems, causing them to wilt and die. To handle vine borers:
- Look for signs of wilting vines, and immediately remove affected parts.
- You can also try covering your pumpkin stems with row covers to protect them from borers.
2. Preventing and Treating Powdery Mildew
Powdery mildew is a common fungal disease that appears as a white, powdery substance on the leaves. If left unchecked, it can stunt pumpkin growth and reduce yield. Here’s how to manage it:
- Prevention:
- Space plants properly to improve airflow around the vines.
- Water at the base of the plants to keep the leaves dry.
- Treatment:
- Spray your plants with a natural fungicide, like a baking soda solution (1 tablespoon of baking soda mixed with 1 gallon of water).
- Remove infected leaves immediately to prevent the spread of the fungus.

3. Managing Pumpkin Rot and Diseases 
Pumpkins can suffer from various rot diseases, especially if the vines are overly wet or damaged. Here’s how to prevent and treat common pumpkin rot:
- Phytophthora Rot: This disease thrives in overly wet soil and causes pumpkin fruit to rot. To prevent it:
- Ensure proper drainage in your garden and avoid overwatering.
- Remove and destroy infected plants to prevent the spread of the disease.
- Fusarium Wilt: A soil-borne fungus that causes yellowing leaves and wilting, Fusarium wilt can be controlled by rotating crops each year. Avoid planting pumpkins in the same spot more than once every three years.
4. Preventing Leaf Spot and Other Fungal Infections
Fungal infections like leaf spot can cause unsightly brown or black spots on the pumpkin leaves, reducing the plant’s ability to photosynthesize. Here’s how to prevent it:
- Spacing and airflow: Keep the vines well-spaced to ensure good airflow around the leaves.
- Watering: Water early in the day to allow the leaves to dry before evening, reducing the risk of fungal growth.
- Remove infected leaves: If you spot any infected leaves, prune them immediately to prevent further spread.
By keeping an eye out for common issues and pests, and taking action quickly, you can ensure a healthy, productive pumpkin crop. With these practical tips, you’ll be well on your way to managing your pumpkin patch like a pro! 
5. Harvesting and Storing Your Pumpkins
Once your pumpkins have matured and are ready to be harvested, it’s time to reap the rewards of your hard work! Proper harvesting and storage are key to ensuring your pumpkins last long and stay fresh. Here’s how to do it right:
1. When to Harvest Your Pumpkins
Knowing the right time to harvest your pumpkins is crucial to getting the best results. Here’s what to look for:
- Color: Pumpkins should be vibrant and fully colored. Whether it’s deep orange, green, or other colors, they should have a rich, consistent hue.
- Firmness: The pumpkin’s skin should be hard to the touch. Gently press your fingernail into the skin—if it doesn’t leave a mark, it’s ready.
- Stem: The stem should be dry and brown. If it’s still green or soft, wait a little longer to allow the pumpkin to fully mature.
- Sound: Tap the pumpkin. If it sounds hollow, that’s a good sign it’s ready for harvest!
2. How to Harvest Your Pumpkins
When it’s time to harvest, be careful not to damage the pumpkin or vine. Follow these steps:
- Cut the stem: Use a sharp knife or garden shears to cut the pumpkin from the vine. Leave at least 3 inches of stem attached to prevent rot.
- Handle with care: Gently lift the pumpkin to avoid bruising or cutting it. Avoid dragging pumpkins across the ground, as this can damage the skin.
- Inspect for damage: Before storing, check each pumpkin for any cuts, bruises, or soft spots. Only store the healthiest pumpkins for the longest shelf life.

3. Curing Your Pumpkins
Curing pumpkins is an essential step to ensure they store well and last longer. Here’s how to do it:
- Sun-dry for 10-14 days: After harvesting, place your pumpkins in a warm, dry spot with good airflow (such as a porch or shed) for about 10-14 days. This helps to harden the skin and reduces the chance of rot.
- Turn them daily: If possible, turn the pumpkins each day to ensure they dry evenly.
4. Storing Your Pumpkins for Longevity 
To keep your pumpkins fresh throughout the season, proper storage is key:
- Cool, dry place: Store your pumpkins in a cool, dry place with temperatures around 50°F to 60°F (10°C to 15°C). Avoid storing them in a damp or humid area.
- Proper ventilation: Store pumpkins on a flat surface, such as a wooden shelf or cardboard, to allow for good air circulation. Don’t pile them on top of each other, as this can cause bruising and rotting.
- Check regularly: Inspect your stored pumpkins every week. Remove any that show signs of mold or rot to prevent it from spreading to healthy pumpkins.
By following these simple yet effective steps, you’ll ensure your pumpkins are harvested at their peak and stored properly for long-lasting enjoyment. Happy harvesting and enjoy your delicious, home-grown pumpkins!
Conclusion
Growing pumpkins from a pumpkin is more than just a gardening project—it’s a step towards a more sustainable, self-sufficient, and rewarding way of farming. By following the steps in this guide, you can enjoy the satisfaction of harvesting your own pumpkins year after year, while also contributing to a healthier environment.
So, whether you’re a seasoned gardener or just getting started, growing pumpkins from a pumpkin is a simple, fulfilling way to embrace sustainability while reaping the rewards of your hard work. Get out there, start planting, and watch your pumpkins grow!
Happy gardening! 