
Imagine walking through your garden, the air filled with the calming scent of flowers, and your eyes resting on the vibrant, floating beauty of a water lily 🌸. Now, picture growing that beauty yourself—from a simple seed. Sounds dreamy, right? But here’s the catch: growing water lily seeds can seem like a challenge for beginners, especially when it feels like a mystery. You may wonder, “How do I turn these tiny, unassuming seeds into the stunning blooms I’ve always admired?”
In this guide, we’ll show you exactly how to grow and care for water lily seeds, step by step. Whether you’re a first-time gardener or just looking to expand your pond’s beauty, understanding the right conditions and methods can unlock the magic of water lilies in your own backyard 🌿. Let’s dive in and transform your garden into a water lily paradise!
Understanding Water Lily Seeds
Before you dive into growing water lily seeds, it’s essential to understand what these tiny wonders are all about 🌱. Water lily seeds are the beginning stage of one of the most beautiful aquatic plants that can transform your garden pond into a peaceful oasis. But to grow them successfully, it’s helpful to know what you’re working with and the different types of water lilies available.
What Are Water Lily Seeds?
Water lily seeds are the reproductive bodies of water lilies, just like how any plant has seeds to produce new generations 🌸. These seeds are typically small, hard, and can be either floating or submerged in water. When planted in the right conditions, they sprout and grow into lush, green plants that eventually produce stunning, colorful flowers.
While it might seem like a long journey from seed to bloom, it’s a rewarding process that can add vibrant life to your garden or pond.
Types of Water Lily Seeds 🌺
There are two main types of water lilies that you’ll encounter: hardy and tropical. Understanding these types will help you choose the best water lily seeds for your environment.
- Hardy Water Lilies: These are perfect for cooler climates and can survive winter by going dormant. Hardy lilies typically grow slower but are robust, making them a great option for beginners in temperate zones. 🌿
- Tropical Water Lilies: Known for their vibrant and striking colors, these lilies thrive in warm temperatures and require more care than their hardy counterparts. If you live in a tropical or subtropical area, tropical lilies can thrive in your pond year-round. 🌞
Each type has its specific needs, so knowing which one suits your climate and growing conditions is key to success.
Why Understanding Water Lily Seeds Matters
Knowing the differences between types of water lilies helps you prepare the right growing environment and avoid common mistakes. It’s also important to realize that water lily seeds need patience. They don’t grow overnight, but with the right setup, you’ll be able to enjoy their stunning blooms in a few months.
With the foundation laid, you’re now ready to explore how to grow and care for your water lily seeds. Stick with us, and let’s take the next step toward cultivating your water lily garden! 🌸
Why Grow Water Lily Seeds?
You might be wondering, “Why should I bother growing water lily seeds?” 🤔 After all, they can seem like a bit of a challenge for beginners. However, growing water lilies from seeds offers many benefits, making it a worthwhile endeavor for anyone looking to add beauty and tranquility to their garden or pond.
1. Cost-Effective Way to Get Beautiful Water Lilies 🌸
Buying fully grown water lilies can be expensive, especially if you’re looking for a variety of colors and sizes. By growing water lily seeds, you can save money while still getting the same stunning results. Water lily seeds are generally much cheaper, making them a budget-friendly option for gardeners.
2. A Sense of Accomplishment 🌱
There’s something incredibly satisfying about growing plants from seed. Watching your water lily seeds sprout, grow, and eventually bloom is an incredibly rewarding experience. It’s a reminder that with patience and care, you can nurture life in your own backyard. Plus, you’ll have bragging rights when your friends admire your water lilies and ask how you grew them!
3. Water Lilies Improve Your Pond’s Health and Beauty 🏞️
Water lilies do more than just look beautiful. They help improve the health of your pond by providing shade and reducing algae growth. The large leaves float on the surface, blocking sunlight from reaching the water, which helps maintain a balanced ecosystem. Plus, they create a serene, tranquil vibe—perfect for relaxing or attracting wildlife.
4. Perfect for Various Garden Sizes 🌿
Whether you have a large garden pond or a small container garden, water lilies can fit right in. They’re versatile and can thrive in different environments. Even if you don’t have a traditional pond, you can grow them in containers or small water features. It’s an easy way to bring nature closer to home, no matter the size of your outdoor space.
5. Endless Variety and Colors 🌈
Water lilies come in a variety of colors, including pink, white, yellow, and purple. Growing your own water lilies allows you to choose the colors that best fit your aesthetic preferences. Plus, it’s an exciting journey to discover what colors and varieties emerge from your seeds.
6. A Long-Lasting Investment 🌻
Water lilies are perennial plants, meaning they come back year after year. Once you’ve successfully grown your first batch of water lilies, you can enjoy their blooms season after season. Growing water lily seeds isn’t just a one-time investment—it’s a long-term addition to your garden.
The Best Conditions for Growing Water Lily Seeds
To successfully grow water lily seeds, creating the ideal environment is essential. Water lilies, while beautiful, are also quite specific in their needs. Let’s explore the best conditions to give your seeds the best chance of thriving 🌿.

1. Choosing the Right Environment 🌞
Water lilies love the sun! They require full sunlight to grow and bloom properly. Ideally, they should receive at least 4–6 hours of direct sunlight per day. If you’re growing them in a pond or a container, place them in a sunny spot where they’ll get plenty of light. 🌸
- Why it matters: Sunlight helps water lilies produce energy through photosynthesis, which is crucial for healthy growth and vibrant blooms.
2. Water Temperature: Keep it Warm 🌡️
Water lilies thrive in warm water. The ideal water temperature for germinating and growing water lily seeds is between 70°F and 85°F (21°C to 29°C). Anything cooler can slow down the growth, while water that’s too hot can cause stress.
- Tip: If you live in a cooler climate, consider growing your water lilies indoors in a container or using a pond heater during the cooler months. 💧
3. Water Depth: The Right Level Matters 💦
Water lilies prefer shallow water with a depth of 12 to 18 inches (30 to 45 cm) for seeds to sprout and grow. As the plants mature, they’ll need more depth, but for germination, shallow water works best.
- Why it matters: Shallow water ensures that the seeds are submerged enough to sprout without being overwhelmed by deep water that could prevent them from getting enough sunlight.
4. Water Quality: Clean and Balanced 🧪
The water where your water lily seeds grow should be clean and free of chlorine. Using dechlorinated water is ideal, as chlorine can harm the plants. You also want to maintain a slightly acidic to neutral pH (between 6.0 and 7.0).
- Tip: If you’re using a pond or container, consider installing a small water filter to keep the water clean and clear, preventing algae buildup and maintaining a healthy environment.
5. The Right Soil for Your Water Lilies 🌱
Water lilies prefer loamy soil that is rich in organic matter. Avoid soil that is too sandy or too heavy. A good mix will allow for drainage while still holding enough moisture to keep the roots happy.
- Tip: You can use aquatic plant soil or a topsoil mixture combined with sand for the perfect balance. Make sure your container or pond has a large, flat area for the water lilies to settle into.
6. Container vs. Pond: Choosing What’s Best for You 🏞️
You can grow water lilies in either a pond or a container—both have their advantages.
- Pond: If you have a pond, it’s perfect for water lilies to spread their roots and bloom naturally.
- Container: If space is limited, water lilies can also grow in containers or water garden kits. Just make sure the container has enough space for root expansion and is large enough to accommodate their growing size.
7. Avoid Water Movement 🌊
Water lilies prefer calm waters with little to no movement. Strong currents or high water flow can disturb the seeds and damage the delicate plants.
- Tip: If you have a pond with a filter or pump, make sure the water lilies are placed in an area with minimal water circulation. You can use rocks or barriers to shield them from excessive flow.
Step-by-Step Guide to Planting Water Lily Seeds
Planting water lily seeds might sound complicated, but with the right steps, it can be a fun and rewarding process! 🌸 Whether you’re growing them in a pond or a container, this step-by-step guide will walk you through everything you need to know to get your seeds off to a healthy start.

Step 1: Prepare the Seeds for Planting 🧑🌾
Before planting your water lily seeds, it’s important to prepare them properly.
- Soak the Seeds: Place your water lily seeds in a bowl of warm water for 24 to 48 hours. This helps soften the seed’s hard shell, improving the chances of successful germination. 💧
- Scarify (Optional): For tougher seeds, gently scratch the outer layer of the seed with sandpaper or a knife. This helps speed up the germination process by allowing water to penetrate the seed.
Step 2: Prepare the Potting Container 🏺
Choosing the right container is key to success.
- Select a Container: Use a shallow container or a pond basket with good drainage. A small pot with a diameter of 12 to 14 inches is usually sufficient for starting water lily seeds.
- Add Soil: Fill your container with loamy, well-draining soil. Water lilies like soil that holds moisture without being too heavy. You can buy special aquatic soil, or mix equal parts of topsoil and sand.
Step 3: Plant the Seeds 🌱
Now that your seeds are prepped, it’s time to plant them.
- Place the Seed: Gently bury the soaked water lily seed about 1–2 inches deep in the soil. The seed should be positioned with the pointed end facing downward and the flat side facing up, to give it the best chance of sprouting.
- Press Lightly: Lightly press the soil around the seed to ensure it stays in place.
Step 4: Submerge the Container in Water 💦
Water lilies need a submerged environment to grow.
- Water Depth: After planting, gently lower the container into the water. The seed should be submerged at a depth of around 6 to 12 inches (15 to 30 cm), depending on the water lily variety.
- Water Quality: Ensure the water is clean, free of chlorine, and kept at an ideal temperature (between 70°F and 85°F or 21°C to 29°C). This promotes healthy growth.
Step 5: Provide the Right Environment 🌞
Now that your seeds are planted, give them the best conditions to thrive.
- Sunlight: Place your container in a sunny spot where the water lilies will receive 4 to 6 hours of direct sunlight daily. 🌞 If growing indoors, use grow lights if needed.
- Temperature: Make sure the water stays warm enough (70°F–85°F). If the weather is too cold, consider using a small water heater to maintain the right temperature.
Step 6: Patience During Germination ⏳
Germination can take time, so don’t get discouraged!
- Wait for Germination: Water lily seeds generally take 2 to 4 weeks to sprout, though some varieties may take longer. During this time, check the water regularly to make sure it stays clean and free of debris.
- Gently Adjust Depth: As the seed begins to sprout, adjust the water depth to allow the growing plant to stay submerged at a consistent level. The leaves should rise to the surface once they have developed.
Caring for Water Lily Seeds During Germination
Caring for water lily seeds during their germination phase is critical to their success. While it can take time for the seeds to sprout, with the right care and attention, you’ll soon see your water lily seeds transform into healthy plants 🌿. Here’s how to give them the best possible environment during this crucial stage.

1. Maintain the Right Water Temperature 🌡️
Water lilies thrive in warm water, and maintaining the right temperature is essential for seed germination. Aim to keep the water temperature between 70°F and 85°F (21°C to 29°C).
- Why it matters: Water that is too cold will slow down the germination process, while water that’s too hot can stress the plants. If you live in a cooler climate, consider using a small pond heater to maintain the warmth.
2. Ensure Proper Sunlight ☀️
Water lily seeds need plenty of sunlight to germinate and grow. After planting the seeds, make sure they receive 4 to 6 hours of direct sunlight per day.
- Tip: If you’re growing your water lilies indoors, consider using grow lights to supplement natural sunlight, ensuring the seeds get enough light for healthy growth.
3. Monitor Water Quality 💧
Clean water is essential for healthy germination. Check the water quality regularly to ensure it’s free from chlorine, dirt, and debris.
- Tip: Use dechlorinated water or rainwater for the best results. You can also add a small water filter to your container or pond to keep the water fresh and clear.
4. Avoid Overcrowding 🌱
While it’s tempting to plant many seeds in a small container, overcrowding can inhibit their growth. Water lilies need space to grow and develop their roots.
- Tip: If you’re growing multiple seeds, space them out appropriately and avoid cramming too many into one container. This will allow each seed the room it needs to sprout and grow strong.
5. Monitor for Germination Signs 👀
Water lily seeds can take anywhere from 2 to 4 weeks to germinate, though some may take longer. You’ll start seeing small roots emerging from the seeds, followed by leaves beginning to rise toward the surface of the water.
- What to do: Be patient! As the seeds begin to sprout, avoid disturbing them. Ensure the water level remains consistent, and the seeds stay submerged at the right depth for optimal growth.
6. Check for Pests or Disease 🐛
While water lilies are relatively resistant to pests, they can still fall victim to algae growth or other aquatic pests that might harm the seeds.
- Tip: Keep an eye on the water for any signs of algae or pests. If you notice any, carefully remove them by skimming the surface or using a non-toxic treatment to keep your water lily seeds safe.
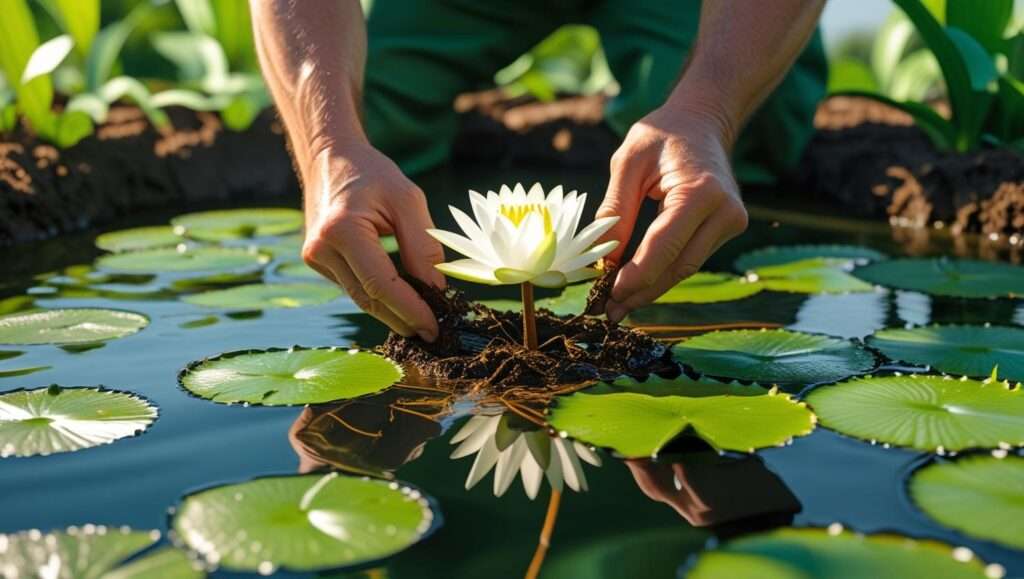
Transplanting Water Lilies to a Pond or Garden
Once your water lily seeds have successfully sprouted and grown into young plants, it’s time to transplant them into a pond or garden space for continued growth. Transplanting is a crucial step that helps the plants thrive and reach their full potential. Here’s how to do it smoothly and effectively 🌿.
1. When to Transplant Water Lilies 🌸
Knowing the right time to transplant your water lilies is key to ensuring their success.
- Signs to look for: When the leaves have grown large enough to float on the water’s surface and the roots have started to spread, your water lilies are ready to be transplanted.
- Timing: The best time to transplant water lilies is early spring or summer, when the water temperature is warm enough to encourage healthy growth (around 70°F to 85°F or 21°C to 29°C).
2. Preparing the Pond or Garden Space 🏞️
Whether you’re transplanting into a pond or a garden container, it’s important to prepare the space to give your water lilies the best start.
- For a Pond: Choose a location with shallow water (12 to 18 inches deep). The area should receive at least 4–6 hours of sunlight per day.
- For a Container: Use a wide, shallow container (12–14 inches in diameter) with good drainage. Fill it with loamy, slightly acidic soil to allow the roots to expand comfortably.
3. How to Transplant Water Lilies 🌱
Here’s the step-by-step process to move your water lilies from their initial growing container to their permanent home.
- Step 1: Gently Remove the Seedling: Carefully remove the water lily plant from its current container. Be gentle to avoid damaging the roots.
- Step 2: Trim Excess Roots (Optional): If the roots are too long or tangled, trim them slightly to promote new growth. Avoid cutting too much, as the roots need to be healthy and strong.
- Step 3: Place the Plant in the New Container or Pond: Position the plant in the new container or pond, ensuring that the crown (the top of the plant) is just below the water’s surface. This allows the leaves to float freely and ensures the plant gets enough sunlight.
- Step 4: Fill with Water: Gently fill the container or pond with water, ensuring the soil stays intact. Make sure the plant stays submerged at the correct depth.
4. Caring for Transplanted Water Lilies 🌞
After transplanting, continue to monitor your water lilies to help them adjust and thrive.
- Sunlight: Ensure the transplant gets enough sunlight (4–6 hours of direct light per day). 🌞
- Water Quality: Keep the water clean and clear, as poor water quality can stress the plant. If growing in a pond, consider using a water filter.
- Fertilization: Water lilies benefit from slow-release aquatic fertilizer. Add a small amount once a month to encourage healthy root development and vibrant blooms.
5. Common Mistakes to Avoid ❌
Transplanting water lilies can be tricky if you’re not careful. Here are a few common mistakes to watch out for:
- Too Deep or Shallow: Planting water lilies too deep or too shallow can hinder their growth. The crown should be just below the surface, not buried deep in the soil.
- Rushing the Process: If you transplant too soon, before the plant is fully established, it may struggle to adapt to the new environment. Be patient and wait until the plant is strong enough to survive on its own.
Common Issues and Troubleshooting Tips
Growing water lilies from seeds can be a rewarding journey, but it’s not without its challenges. If your water lily seeds aren’t sprouting as expected or your plants aren’t thriving, don’t worry! Here are some common issues you might face during the growing process, along with troubleshooting tips to help you get your water lilies back on track 🌸.

1. Water Lily Seeds Not Germinating 🌱
If your water lily seeds haven’t sprouted after several weeks, it can be frustrating. Here are a few reasons why this might happen:
- Cold Water Temperature: Water lily seeds need warm water (70°F–85°F or 21°C–29°C) to germinate. If the water is too cold, germination may be delayed or fail altogether.
- Fix: Use a small pond heater to keep the water temperature stable and warm.
- Poor Water Quality: Chlorine or other chemicals in the water can prevent seed germination.
- Fix: Always use dechlorinated or rainwater for growing water lilies, or treat tap water with a dechlorinator.
- Old Seeds: Sometimes, water lily seeds can be old or improperly stored, affecting their ability to germinate.
- Fix: Always use fresh seeds and store them properly in a cool, dry place.
2. Yellowing Leaves or Stunted Growth 🍂
If your water lily leaves are turning yellow or your plant is growing slowly, this could be a sign that something’s wrong. Some common causes include:
- Nutrient Deficiency: Water lilies need proper nutrients to grow strong and healthy. A lack of key nutrients can lead to yellowing leaves and weak growth.
- Fix: Add a slow-release aquatic fertilizer to the water to ensure the plant is getting the nutrients it needs. Be careful not to over-fertilize, as this can lead to algae problems.
- Too Much or Too Little Sunlight 🌞: Water lilies require 4 to 6 hours of direct sunlight per day. Too much sun can cause the plant to dry out, while too little can stunt its growth.
- Fix: Move your water lily to a location that receives balanced sunlight. If growing indoors, use grow lights to supplement natural light.
3. Roots Rotting or Blackening 💀
If the water lily roots are turning black, mushy, or starting to rot, this can be a sign of overwatering or poor water quality. Water lilies need clean, well-draining soil to prevent root rot.
- Fix: Check the water quality regularly and ensure it’s free of algae and debris. If the soil is too compact, repot the water lily in fresh, loamy soil with proper drainage.
4. Algae Overgrowth 🌿
Algae can easily overtake your water lily container or pond, especially in warm conditions. Too much algae can block sunlight and rob the water of oxygen, harming your plants.
- Fix: Clean the water regularly to remove algae, and add aquatic plants to compete with the algae for nutrients. You can also use non-toxic algae control products.
- Prevention Tip: Avoid excessive fertilization, as it can encourage algae growth. Keep the water lilies spaced out to allow for better air circulation.
5. Pests or Infections 🐛
Although water lilies are generally resistant to pests, they can still fall victim to aphids, snails, or fungal infections. If you notice holes in the leaves or a strange discoloration, it could be due to pests or disease.
- Fix: Remove visible pests by hand or use a non-toxic insecticidal soap. If fungal infections occur, cut off affected parts and dispose of them.
- Prevention Tip: Keep the water clean and avoid overcrowding to reduce the risk of pests and diseases.
Advanced Tips for Experts
If you’ve already successfully grown water lilies from seeds and are looking to elevate your gardening game, these expert tips will help you take your water lily care to the next level 🌿. Whether you’re aiming for faster germination or enhancing your plant’s growth, these advanced strategies will make you a water lily pro.
1. Speed Up Germination with Bottom Heat 🔥
For those who want to accelerate the germination process, adding bottom heat can give your water lily seeds the extra warmth they need to sprout faster.
- How it works: Use a heat mat designed for aquariums or garden seed starting. This gentle heat helps create a more consistent temperature around the seed, speeding up the germination process.
- Tip: Ensure that the water temperature stays between 70°F and 85°F (21°C–29°C). Too much heat can harm the seed, so monitor it closely.
2. Use Artificial Lighting for Indoors 💡
If you’re growing water lilies indoors or in areas with limited sunlight, consider using artificial grow lights. This can mimic the sun’s rays and encourage faster and healthier growth.
- How it works: LED grow lights or fluorescent bulbs specifically designed for plant growth provide the right spectrum of light that water lilies need to thrive indoors.
- Tip: Position the light 6–12 inches above the plants, ensuring they get 12–16 hours of light per day for optimal growth.
3. Improve Root Growth with Root Hormones 🌱
If you want your water lilies to develop strong, healthy roots, using rooting hormones can help boost root development, especially when transplanting.
- How it works: Rooting hormones contain growth regulators that promote faster root growth. Simply dip the cut end of a water lily root into the hormone before planting it in the new pot or pond.
- Tip: Use natural rooting hormones (like willow water) if you prefer an organic method.
4. Increase Flowering with Regular Pruning ✂️
To encourage more blooms, regular pruning of your water lily can help the plant focus its energy on flower production instead of sustaining old leaves.
- How it works: Remove dead or yellowing leaves regularly, as they can take up space and energy that could go toward flower production.
- Tip: Prune any excess foliage early in the growing season to give the plant enough energy to produce blooms throughout the warmer months.
5. Create a Stunning Water Lily Display with Multiple Varieties 🌈
If you’re feeling creative and want to add even more beauty to your garden or pond, consider planting multiple varieties of water lilies with different bloom times and colors.
- How it works: By planting hardy and tropical lilies in different sections of your pond, you can enjoy water lilies blooming throughout the year, with each variety adding unique beauty to your space.
- Tip: Pair colors that complement each other—like yellow with pink or white with purple—for a stunning visual effect.
6. Winter Care for Water Lilies ❄️
In colder climates, winterizing your water lilies is essential to ensure they come back strong next season.
- How it works: Hardy water lilies can survive winter by going dormant in deeper water, but tropical lilies should be brought indoors for the winter months.
- Tip: Before the first frost, cut back the foliage and either move tropical varieties indoors or place hardy lilies in deeper, unfrozen water (around 3 to 4 feet deep).
7. Control Algae Growth with Competitor Plants 🌿
Algae growth can be a common issue in ponds with water lilies, especially during the warmer months. A natural way to combat algae is by adding companion plants that help outcompete algae for nutrients.
- How it works: Plants like water hyacinth or floating ferns can absorb excess nutrients in the water, making it more difficult for algae to thrive.
- Tip: Keep these plants in moderation, as they can also take over if left unchecked.
Growing water lilies from seeds is a rewarding journey that transforms your garden or pond into a tranquil oasis 🌸. By following the steps outlined in this guide—from understanding the seeds to transplanting and troubleshooting common issues—you now have the tools to successfully grow and care for your water lilies. 🌿
Remember, patience is key. Whether you’re planting your first water lily seed or you’re an expert looking to refine your techniques, the process is all about providing the right conditions, keeping a close eye on your plants, and nurturing them with care. With the right attention to detail and the tips shared here, you’ll soon enjoy the stunning beauty of water lilies blooming in your own backyard.
So, take the plunge and start growing your water lilies today! 🌱 You’ve got this. Happy gardening! 😊